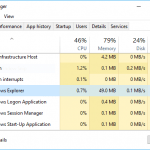
While Windows OS (such as Windows Vista, Windows 7, Windows 8, Windows 8.1 and Windows 10) is running fine, smoothly and quickly over a period of time, suddenly the system may becomes sluggish and slow in responding with non-stop hard disk activity.
When opening up Task Manager (TaskMgr) to investigate, “Processes” component shows that image or process named “TrustedInstaller.exe” is “system” process utilizing almost close to if not total 100% of the CPU resource usage, and using large amount of RAM memory. This problematic symptom may also appear right after system boots up into desktop, causing startup to be slower. In worse scenario, the computer is freezing, hanged and unusable.
TrustedInstaller.exe high CPU usage problem happens in random, and normally only last a few minutes. The system process cannot be ended (killed or terminated) or have it’s priority altered to low or below normal. TrustedInstaller simply run like a realtime task, make Windows slower and grinds to a halt.
However, users no need to worry too much about the high CPU power consumed by TrustedInstaller.exe, nor it’s act of a malicious program. You won’t be able to tell what it’s doing in the background by simply looking at Task Manager, but TrustedInstaller is actually used by a service called “Windows Module Installer” which used to install Windows system modules. The system modules including Windows Update and Automatic Updates which automatically scans your system to check for any new updates, patches and hotfixes available.
So when scheduled Windows Update is performing its update scan or check on your system, the TrustedInstaller.exe process will drain CPU usage and shoot up to 90% or 100% in the graph. Even after finished installing updates and reboot the computer, the Windows PC will slow down as Windows Update uses TrustedInstaller to try to checks for updates again to ensure that no additional updates that are available for download. Beside, not only when checks for updates, but TrustedInstaller.exe also responsible for installing critical updates if you set Automatic Updates to download and install updates automatically at scheduled time or randomly. Installing update will surely adds more burden to the CPU and nonstop hard drive read/write IO will cause users to simply unable to use computer.
The simplest resolution for the TrustedInstaller high CPU usage problem is to just relax, wait for a while for the TrustedInstaller.exe to complete its jobs. Once it finishes running the tasks, the CPU usage rate will return to normal.
However, if you want to stop TrustedInstaller.exe takes out all CPU resource problem to occur, you may run into risk of causing updates, whether it’s updating Windows operating system or any other programs, to fail. However, here’s a few suggestions that you may take to avoid Windows system slow responding due to TrustedInstaller.exe extreme high CPU usage.
Firstly, try to set Automatic Updates to full manual or at least let you choose whether to install the updates as installation normally takes up more system resources and will definitely annoy users with lagging system performance, especially if you’re in the midst of watching movie or playing online game.
To change Automatic Windows Update setting, go to Control Panel -> System and Maintenance -> Turn automatic updating on or off under Windows Update section. Under Choose how Windows can install updates section, click on radio button next to Never check for updates (not recommended) or Check for updates but let me choose whether to download and install them or Download updates but let me choose whether to install them. Then click on OK then click on Continue or Yes button for UAC prompt. Note that if you choose the not recommended option, you have to manually run the Windows Update to update your system.
You can also try the following solution, which deals with Windows Module Installer that runs TrustedInstaller.exe.
Stop Windows Module Installer to Start When Startup
- Click on Start button, and type MSConfig into Start Search box, then press Enter.
- Press Continue or Yes when prompted with User Account Control dialog box.
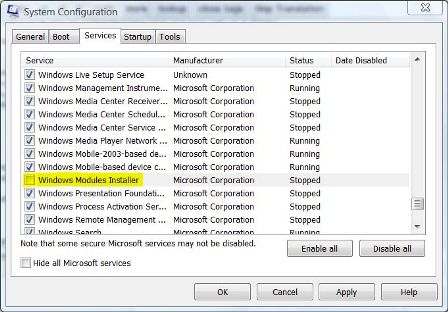
- In System Configuration, click on Services tab.
- Untick the check box next to Windows Module Installer to stop it from loading with Windows.
- Click OK.
Set Windows Module Installer Startup Type to Manual
- Go to Control Panel, then click on System and Maintenance link, and then open Administrative Tools window.
- Open Services applet.
- In User Account Control dialog, click Continue.
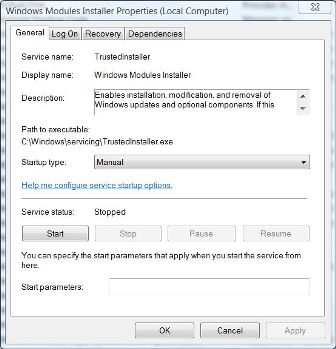
- Locate the Windows Module Installer service, then right click on it and select Properties.
- In the General tab, click on the drop down menu of Startup Type, and select Manual.
- Click Apply.
- If the services status is running, click on Stop button.
- Click OK.
Note that this solution is not tested before. If there is any problem emerges, set and revert back the setting to its original configurations. Setting the startup type to manual ensures that the service can still be ran when needed.
