How to Disable or Enable Windows Defender in Windows 10
Windows Defender is the default built-in free antivirus and anti-malware solution in Windows 10 that protects the computer against viruses, malware, spyware, and other threats, and provides network inspection, boot-time and real-time protection when using Windows PC.
Windows Defender was first introduced as a free antispyware program download for Windows XP. It then started to include in Windows Vista and Windows 7 by default, and enhanced to be a full antivirus program replacing Microsoft Security Essentials as part of Windows 8, continuing to Windows 10 and later versions.
Before you decide whether to turn on or turn off Windows Defender in Windows 10, there are two points which you should aware of.
Windows Defender is automatically enabled on new Windows 10 system and when no other antivirus, antimalware or security protection software is installed.
If you install another anti-malware or antivirus program for security protection, Windows Defender automatically disabled itself.
How to Turn Off Windows Defender
If you’re not a fan of Windows Defender, or already purchased or provided with the license of third-party security software, you can disable Windows Defender using one of the following methods.
Disable Windows Defender without another antivirus or anti-malware software exposes the PC to considerable security risks.
Method 1: Install Another Antivirus or Anti-Malware Security Software
Windows 10 disables Windows Defender when it detects another antivirus security protection software is installed. For example, Symantec, Norton, McAfee, Kaspersky, AVG, Comodo, 360, Avira, Panda, ZoneAlarm, ESET and etc. No other action is required.
Method 2: Disable Windows Defender via Group Policy
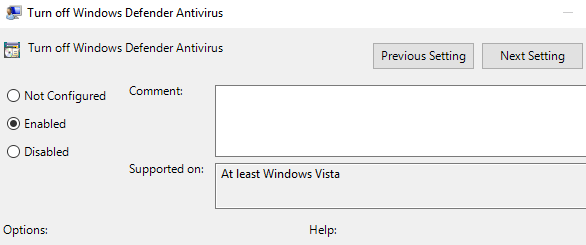
Open Local Group Policy Editor (GPedit.msc).
Navigate to Computer Configuration -> Administrative Templates -> Windows Components -> Windows Defender (in Windows 10 RTM / v1511 / v1607) or Windows Defender Antivirus (in Windows 10 v1703 or later).
In the right pane, double click on Turn off Windows Defender or Turn off Windows Defender Antivirus.
Select Enabled radio button to disable the Windows Defender.
Press OK or Apply. You may need to restart the computer for the change to take effect.
Method 3: Turn Off Real-Time Protection of Windows Defender
This method is temporary, until the next system reboot.
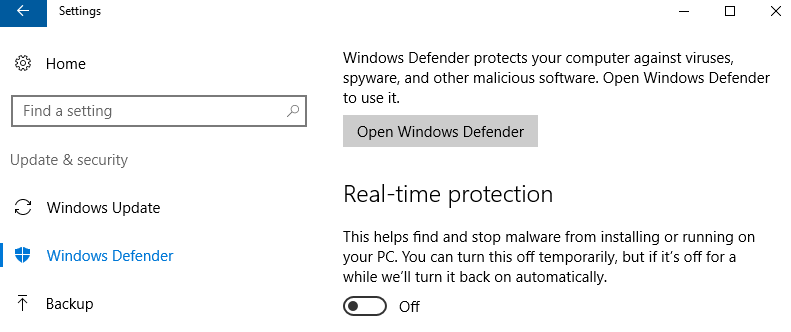
In Windows 10 RTM, Windows 10 November Update and Windows 10 Anniversary Update:
Under the “Real-time protection” section, toggle the slider to Off.
In Windows 10 Creators Update or later:
Open Windows Defender Security Center.
Go to Virus & thread protection.
Under the “Real-time protection” section, toggle the slider to Off.
If applicable, click or tap on Yes on User Account Control dialog prompt to allow the app makes changes to the system.
Method 4: Remove Auto Startup and Disable Windows Defender via Registry
The following changes to registry essentially implements the group policy that turns off Windows Defender as outlined in method 2 above. So this method is useful if your home edition of Windows 10 does not come with Local Group Policy Editor. In addition, it also removes any startup items that defined as Windows Defender related (only useful in earlier version of Windows).
You can copy and paste the following text into a text file and save with a .reg extension, and then run it to apply registry registration entries to system registry automatically. Or, you can manually navigate to each and every registry key to make the necessary changes.
Windows Registry Editor Version 5.00

[HKEY_CURRENT_USER\SOFTWARE\Microsoft\Windows\CurrentVersion\Run]
"Windows Defender"=-

[HKEY_LOCAL_MACHINE\SOFTWARE\Microsoft\Windows\CurrentVersion\Run]
"WindowsDefender"=-

[HKEY_LOCAL_MACHINE\SOFTWARE\Microsoft\Windows\CurrentVersion\Explorer\StartupApproved\Run]
"Windows Defender"=-

[HKEY_LOCAL_MACHINE\SOFTWARE\Policies\Microsoft\Windows Defender]
"DisableAntiSpyware"=dword:00000001
How to Turn On Windows Defender
Normally, Windows 10 forces Windows Defender to run when it detects the system no longer have any security protection. If it’s not the case, or you’ve previously manually disabled Windows Defender, follow the tutorial below to re-enable Windows Defender. To make sure that Windows Defender could be enabled, make sure that following:
No third-party antivirus or anti-malware security protection software is installed (in such cases, you can only enable periodic scanning with Windows Defender).
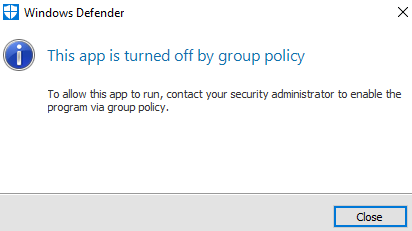
The group policy (or via registry key) is not set to turn off Windows Defender as mentioned in method 2 and method 4 above. If the policy or registry key is set, do disable the policy or remove the registry key. Otherwise you will see the following error:
The service couldn’t be started.
The program is blocked by group policy. For more information, contact your system administrator.
Click Help for more information about this program.
Or,
This app is turned off by group policy
To allow this app to run, contact your security administrator to enable the program via group policy.
Open Windows Defender or Windows Defender Security Center (in newer versions of Windows 10).
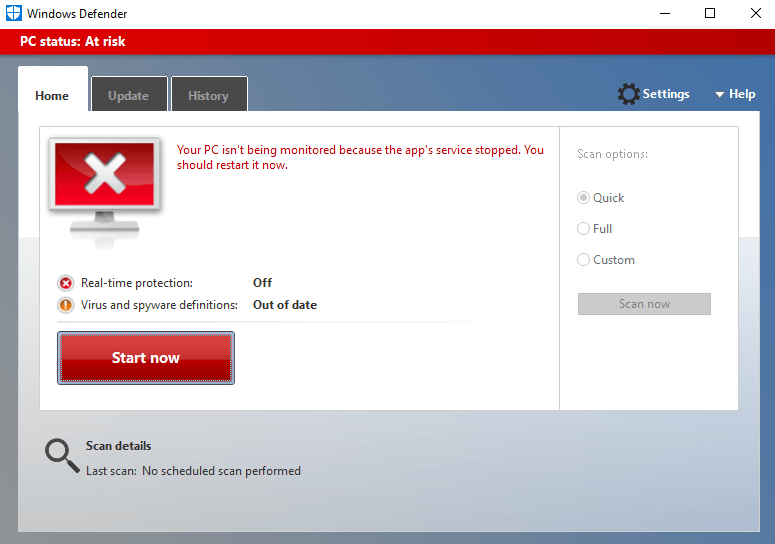
In Windows Defender, the window will display a red cross that indicates there are some issues with Windows Defender, e.g. app’s service is stopped or real-time protection is turned off. Depending on the scenario, click or tap on the red Start now or Turn on button to enable Windows Defender.
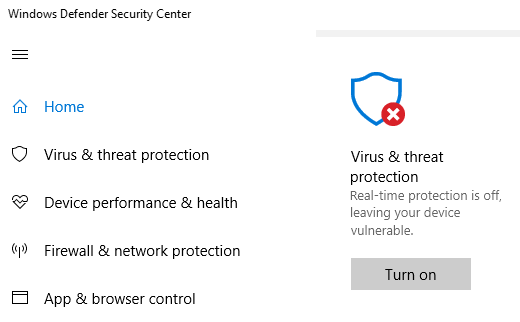
In Windows Defender Security Center, the red cross will appear on the lower right corner of shield icon above the “Virus & thread protection”. Below the title is the description on the issue that causes the error warning, such as real-time protection is off or threat service has stopped. Click or tap on the Turn on or Restart now to turn Windows Defender back on.
LK is a technology writer for Tech Journey with background of system and network administrator. He has be documenting his experiences in digital and technology world for over 15 years.Connect with LK through Tech Journey on Facebook, Twitter or Google+.

")
 Windows Defender")
")

")