Install and Enable Telnet Server Service in Windows
To accept a incoming Telnet connection, a PC, computer or server must enable and run Telnet Server service which is listening to TCP port 23. By default Windows (i.e. Windows Vista, Windows 7, Windows 8, Windows 8.1, Windows 10) operating system doesn’t install Telnet Server.
The disabling of Telnet Server is good practice to minimize security risks.
The following guide will install and enable Telnet Server in Windows if you really need it running. Telnet Server in Windows is similar to the one comes with Windows Server 2003, where it provides ASCII terminal sessions to Telnet clients, and supports two types of authentication plus four types of terminals: ANSI, VT-100, VT-52, and VTNT.
How to Enable the Telnet Server Service in Windows
Click on Start button or open the Win-X Quick Access menu in Windows 8, Windows 8.1 or Windows 10, then go to Control Panel -> Programs.
Under the Programs and Features section, click Turn Windows features on or off. If User Account Control permission confirmation request warning pops up, click on Continue. If you are prompted for an administrator password, type the password.
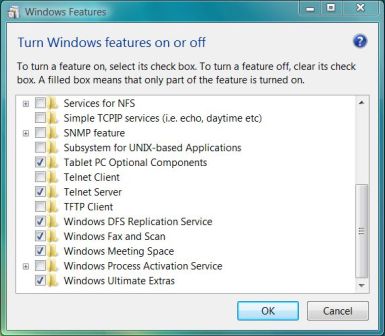
In the Windows Features dialog box, select (tick) the Telnet Server check box.
Click OK. Wait for the installation to finish.
Go back to Control Panel, then go to System or System and Security -> Administrator Tools.
Click on Services applet (services.msc if you prefer to use Run command or Start Search).
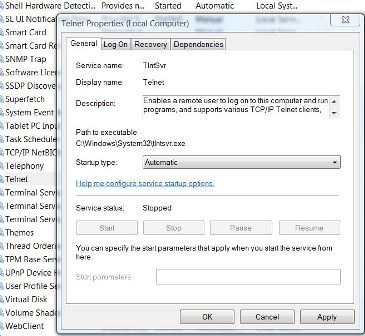
Locate the Telnet service, right-click on it and select Properties.
In the Startup Type drop down menu, select Automatic instead of “Disabled”.
Click on Apply button.
Right-click on the Telnet service again, but this time select Start option on right click context menu. Telnet Server service should be running after this.
Click OK.
After installing Telnet Server Windows feature, instead of going to Services MMC applet, if you prefer you can use elevated command prompt to start Telnet Server, and set Telnet service to run automatically on every system startup. The commands to use are:
Set Start Type option to Auto:
sc config TlntSvr start=auto
Start the Telnet Server immediately:
sc start TlntSvr
Or,
net start TlntSvr
Configuration Options for Telnet Server
As Windows Telnet Server is ported from Telnet Server in Windows 2003, XP and 2000 (W2K), the configuration settings available and how to configure the server are pretty much similar. Generally tlntadmin command is used to administer a local or remote Telnet Server.
For example, you can use tlntadmin command to start, stop, pause or continue Telnet server. Command syntax is:
The Telnet Server requires NTLM authentication by default. To deactivate and disable NTLM authentication and switch to use only password authentication, use following tlntadmin command:
tlntadmn config sec=-NTLM
Another example command that make Telnet session switch to streams mode in order to make display easier for Unix/Linux clients:
LK is a technology writer for Tech Journey with background of system and network administrator. He has be documenting his experiences in digital and technology world for over 15 years.Connect with LK through Tech Journey on Facebook, Twitter or Google+.


 via Registry in Windows 10/8/7/2016/2012/2008/XP")
