Add Custom Channels into Blogger AdSense Page Element Widget / Gadget
Blogger.com allows authors and webmasters to easily add Google AdSense ad units to Blogger blog content pages to earn revenue by displaying relevant ads by using AdSense page element (commonly known as widge) in Blogger template. This feature allows many bloggers who are not familiar or not ready to modify HTML code programming to easily join and put up AdSense ad blocks to the web pages and blogs.
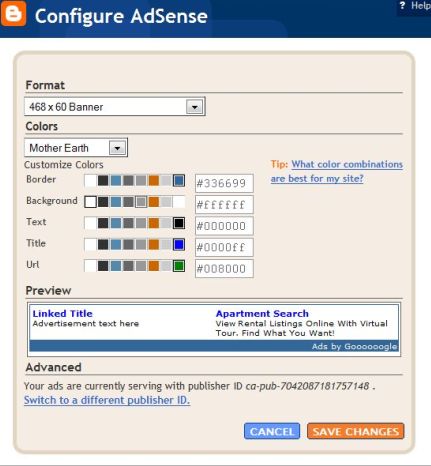
However, when configuring AdSense page element, after signing in and linked Blogger to user’s Google AdSense account, only AdSense publisher ID (e.g ca-pub-7042087181757148) is captured and placed into the ad code in blog’s template. Other settings that can be configured are ad unit format and colors, with no options to set the custom AdSense reporting channel for the ad unit. Custom channel is a feature in AdSense which is used to keep track of ad performance by allowing users to view detailed reporting on performance and revenue statistics of specific pages and/or ad units. Armed with this data, bloggers can then optimize the ad units individually to improve the AdSense performance.
As seen in figure above, there are no direct field to enter a custom channel number using Blogger AdSense widget / gadget. You can switch to use URL Channel if you want, but it doesn’t produce data as detail as Custom Channel. To add custom channels to AdSense ad code automatically added to blog’s HTML source by Blogger template, use HTML/JavaScript widget instead.
Add HTML/JavaScript Page Element In Replacement of AdSense Widget
Remove any AdSense page elements from the blog’s template. To do so, click on Edit link of AdSense gadget element, and then click on Remove Page Element or Remove button.
Add a new HTML/JavaScript widget by click on any Add a Page Element or Add a Gadget link, then click on ADD TO BLOG or + button for the HTML/JavaScript gadget. A “Configure HTML/JavaScript” page will be loaded.
Old Blogger UI
New Blogger UI
Login to Google AdSense account, and generate the ad code by using AdSense Setup for Content product. Remember to select up to five custom channels to track the performance of this ad unit.
Copy and paste the AdSense code generated into the Content text field of Configure HTML/JavaScript. Ignore the Title field.
Click on SAVE CHANGES or Save button. A corresponding HTML/JavaScript element will be added to the template.
Click and drag to realign and rearrange the new page elements to the position you prefer on your blog.
Click on SAVE button on top right corner if needed.
The advantage of using HTML/JavaScript widget instead of AdSense widget is greater control over appearance and settings on AdSense ad unit including ability to add not one, but up to 5 custom channels to an ad unit, and users, especially those without even basic HTML knowledge, still do not need to manually edit the HTML source except to generate the ad code manually from AdSense account. Avoiding editing HTML minimizes risk of mistake that will corrupt the HTML source code or blog template, distorting the blog layout and in worst case, causing users have to reset the page template to default to get start again, losing any changes to Fonts & Colors.
LK is a technology writer for Tech Journey with background of system and network administrator. He has be documenting his experiences in digital and technology world for over 15 years.Connect with LK through Tech Journey on Facebook, Twitter or Google+.


 On Individual Single Post Item View in Blogger")


