Hotspot Shield is essentially a free private secure VPN tunnel service that routes through a US server with USA location IP address. And thus, it has been used not only for security unencrypted wireless connection connected to public WiFi access point, but also been used as a tool to access websites restricted only to visitors from United States, or as a ‘proxy’ to surf anonymously or download shared files from RapidShare, MegaUpload, etc.
Unfortunately, Hotspot Shield now limit the free bandwidth usage (data that been transmitted and tunneled through AnchorFree VPN server) to paltry 3 GB over a rolling 30 days period. The limit is easily hit especially when watching videos on Hulu, Netflix, Pandora or Veoh. When the bandwidth limit exceeded, user may get one of the following error messages when attempting to connect to Hotspot Shield VPN server at Hotspot Shield connect page.
State: Disconnected (Auth Failure)
State: Disconnected (Bandwidth Exceeded)
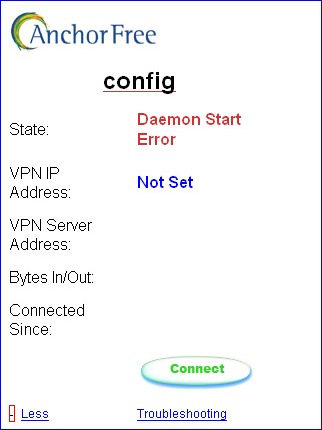
State: Daemon Start Error
State: TCP Connect Wait
After user pressed the connect button, the state will change information from Starting VPN Process to Unknown, to Waiting for server, and then to Authenticating, and finally at Pulling Options before looping repetitively and continuously again and again, until returning one of the error message above. And of course, the connection cannot be established, and VPN tunnel cannot be connected.
All these error messages happen for some specific reason that been detected by the Hotspot Shield server, but ultimately it’s due to the reason that the user has exceeded bandwidth limits, which currently set at 3 GB over a 30 days period. Any user that has used more than 3 GB (used to be 10 GB previously) will not be able to log in until their prior month of bandwidth usage drops below 3 GB.
To fix Bandwidth Exceeded, TCP Connect Wait, Auth Failure or Daemon Start Error when connecting to Hotspot Shield VPN server to establish secure tunnel, user have to beat and bypass the bandwidth limit. By right, AnchorFree should have provided user with option to purchase additional bandwidth when the user overuses and exceeds the limit. However, there is no such options yet. So the workaround option is to reset the bandwidth limit.
MAC (Media Access Control) address is also known as Ethernet Hardware Address (EHA) is a quasi-unique identifier attached to most network adapters (NIC or Network Interface Card). Each and every network adapter has different unique MAC address. Hotspot Shield bandwidth calculation is tied to the MAC address. So by changing the MAC address, Hotspot Shield will treat it as the new PC, and has the bandwidth usage starts from 0 (zero), as if the limit has been reset as user is still using the same system.
Most network interface card (NIC adapter) supports cloning of MAC address. To change the MAC address of supported network adapter, do the following:
Go to Start -> Control Panel.
Double click on Network Connections (inside Network and Internet Connections category).
Right click on the active network connection with network adapter that you want to change the MAC address (normally Local Area Network or Wireless Network Connection) and click on Properties.
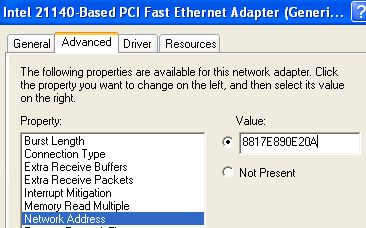
In the General tab, click on the Configure button.
Click on Advanced tab.
In the Property section, select and highlight Network Address or Locally Administered Address.
To the right, “Not Present” radio button is by default selected as value. Change the value by clicking on radio button for Value:, and then type in a new MAC address to assign to the NIC.
The MAC address consists of 6 pairs of numbers (0 – 9) and characters (A – F) combination. For example, 88-17-E8-90-E2-0A. When entering the new MAC value, omit the dash (-), for example 8817E890E20A.
Click OK when done.
To verify the change of MAC address, go to command prompt, then type in one of the following commands:
ipconfig /all
net config rdr
Reboot the computer if successful to make the change effective.
Note that in Windows Vista / Windows 7 / Windows 8 / Windows 8.1 / Windows 10, access to NIC’s properties is from Control Panel -> Network and Internet -> Network and Sharing Center -> Manage Network Connections / Change Network Adapters. Alternatively, go to Device Manager and open the properties dialog of NIC from there.
LK is a technology writer for Tech Journey with background of system and network administrator. He has be documenting his experiences in digital and technology world for over 15 years.Connect with LK through Tech Journey on Facebook, Twitter or Google+.
 - Free Secure and Private VPN for Public WiFi")

")
 with VPN To Protect Privacy and WiFi HotSpot Security")
 Free VPN for iOS, Android, Windows & Mac OS X")


