How to Snipe Pokemons with Poke Go ++ 2.0 With No Soft or Permanent Ban
The PokeGo++ 2.0 is a tweak companion for popular augmented reality (AR) game Pokemon Go. Poke Go ++ A suggested method for sniping with Poke Go++ 2.0. When installed alongside Pokemon Go, Poke Go+ 2.0 provides an overlay with multiple functions to make playing Pokemon Go more fun, and easier.
The primary function that PokeGo++ added to Pokemon Go gameplay is ability to fake GPS location, allowing player to roam the real world without actually visiting to the actual physical location. The ability to simulate location also allows player to ‘snipe’ a Pokemon.
Sniping is essentially teleporting a player to another location in order to engage the Pokemon after it spawned, but return to original location once entering the catching screen before actually throwing any Poke Balls. The technique is very useful when a rare Pokemon such as Dragonite, Snorlax, Lapras, Chansey, Porygon, Muk, Vaporeon and Aerodactyl appears in a far away location which cannot be reached on time in reality.
WARNING: Sniping Pokemon may lead to soft ban, which restrict players to catch wild Pokemons (the Pokemons will still spawn but all will flee after first unsuccessful throw) and collect items through PokeStops for a period of time, although they can still roam around the game. In worst case scenario, your account may be permanently banned. So, snipe Pokemons at your own risk!
UPDATE
From early May 2017, Niantic, the developer of Pokemon Go, has made changes to Pokemons catching mechanism that may render the sniping trick useless, and instantly resulting in softban (where all Pokemons flee on first throw), potentially permanent ban. Pokemon Go now appears to check the location when engaging Pokemon AND when Pokemon is caught, so returning to original home location during battle will result in softban.
The workaround is to teleport to the location and stay there until Pokemon is caught (DON’T return home). Of course, the downside is you must allow reasonable time to travel to that location (or at least 30 minutes1 hour 2 hours of inactivity prior to teleporting as Pokemon Go seems to ‘forgive’ and not penalizing drastic change of location if certain duration elapsed between actions), and you cannot move on to another distant location without another significant downtime unless you’re sniping nearby Pokemon.
The average cool down period for distance traveled in Pokemon Go is about as follow:
1500 KM – 2 hours
1000 KM – 1 hour 30 minutes
750 KM – 1 hour 15 minutes
500 KM – 1 hour
250 KM – 45 minutes
100 KM – 30 minutes
50 KM – 20 minutes
25 KM – 11 minutes
10 KM – 6 minutes
5 KM – 2 minutes
1 KM – 30 seconds
You can enable teleport support in PokeGo++ 2.0 via Settings menu, and then teleport via Map feature as of R22 or R23. Future versions may include dedicated teleport buttonThe snipe button is now effectively a teleport button as the Return Home feature has been removed.
Tip
If a Pokemon that you’re very much desired has spawned but you’re too far from it, you can teleport to the Pokemon’s location, tap on the Pokemon to enter the capture screen, but DO NOT attempt to throw the Poke Balls or feed any berry. Off the screen to let Pokemon Go app running in the background. Make sure you don’t use the smartphone too much as iOS and Android may force close the game to release resources. Wait until the cool down period has passed (e.g. driving time to reach the place or max 2 hours for far flung location, then attempt to catch the Pokemon.
Here’s how to snipe with PokeGo++ 2.0:
Expand the PokeGo++ 2.0 menu by tapping on the Poke Ball icon.
Go to Settings of PokeGo++ 2.0 (the Gear button), and turn on Fake Location.
Set Time to Save Location to Forever.
Make sure that your avatar is stationery (the place will be the home location) and patrol mode is turned off.
Tap on the Snipe button.
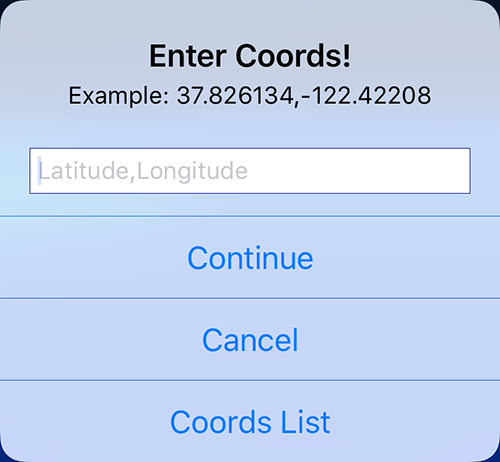
Enter the coordinate of the location where your desired Pokemon that you want to snipe will spawn. Then, tap Continue.
Note
PokeGo++ 2.0 supports coordinates server feed, which provides a list of coordinates for verified Pokemon spawns. If configured, you can just tap on Coords List to open the retrieved Pokemons list, and tap on the Snipe (aim) icon to teleport to that location.
Wait for the Pokemon to spawn, which may take up to 5 minutes. While waiting, DO NOT engage in any other activities, such as spin PokeStop or engage Gym, as it may give away the fact that you’re teleporting to snipe location.
When the Pokemon spawns, tap on it to enter the capture screen. Before throwing a Poke Ball or feeding a Razz Berry, tap on the Return Home at the bottom of the screen (below the Poke Ball) to teleport back to home location. Then, proceed to catch the Pokemon.
Note
If you throw a Poke Ball or feed a Razz Berry, the capturing of Pokemon will most likely fails, and then flee right away, as soft ban is triggered.
Once the Pokemon is caught, you’re back to home location. You can now repeat the sniping process to capture another Pokemon.
It’s imperative to ensure that you’re not soft banned before sniping. To check if you’re soft banned, spin Poke Stop or catch a Pokemon to see if the action success. If you’re softbanned, break the ban by waiting it out, or trying to spin a PokeStop for 40 times (requires to open, spin, close, and repeat), or throw 40 Poke Balls to the ground while catching a Pokemon (no longer work – go back to original location or just wait).
The sniping method above works probably because the game is ‘tricked’ to believe that all your actions are done at a single location, as taping on the Pokemon to enter the Pokemon capture screen does not seem to be an action that check for location, at least for now.
LK is a technology writer for Tech Journey with background of system and network administrator. He has be documenting his experiences in digital and technology world for over 15 years.Connect with LK through Tech Journey on Facebook, Twitter or Google+.

 NotePokeGo++ 2.0 supports coordinates server feed, which provides a list of coordinates for verified Pokemon spawns. If configured, you can just tap on Coords List to open the retrieved Pokemons list, and tap on the Snipe (aim) icon to teleport to that location.
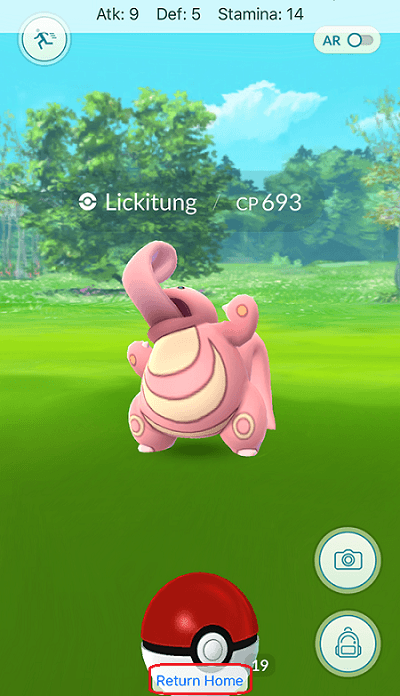 NoteIf you throw a Poke Ball or feed a Razz Berry, the capturing of Pokemon will most likely fails, and then flee right away, as soft ban is triggered.
 to Fake Location Teleport & Snipe & Auto Hatch Egg Without Jailbreak")


")
 Account")

")
")