Create & Migrate Existing Working RedHat / CentOS System to RAID 1 / RAID 10
Linux system has built-in support for software RAID, through MD devices aka Linux Software RAID. Most Linux distributions such as Red Hat Enterprise Linux (RHEL) and CentOS allows you to easily set up RAID arrays while installing the operating system. However, if you already have a fully functional working and running system with multiple hard disk drives, but have so far running on single disk system, converting from single disk to RAID involves a lot more risks and possibilities of system failure.
RAID provides benefits in term of data redundancy and performance improvement, and is recommended setup for mission critical servers. For example, RAID 1 produces a mirrored set, which can tolerate a single disk failure, while potentially speed up performance as read requests can be served by any disk in the array. RAID 10 (RAID 1+0) is a stripe of mirrored sets, or RAID 0 of RAID 1 mirrored sets, which provides better throughput and latency, while tolerate multiple disks failure as long as no mirror loses all its drives.
This tutorial provides step-by-step guide on how to manually create RAID 1 on two disks system or RAID 10 on four disks system on a currently up and running system which already has CentOS / RedHat installed. The GRUB bootloader is also configured in such a way so that the system will still be able to boot if any of the hard drives fails. This is useful especially if you cannot access the console on a dedicated server subscribed from web hosting company, which inadvertently prevent you from creating RAID devices during installation.
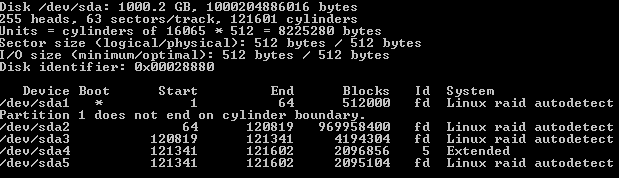
The first phase of migrating a currently running system to RAID without data loss is to ensure all current data is replicated to a degraded RAID. In this tutorial, we’ll work on a system that comes with 477 MB /boot partition as /dev/sda1, more than 900 GB / root partition as /dev/sda2, 4 GB swap space in /dev/sda3, and another 4GB /tmp logical partition /dev/sda5 hosted on /dev/sda4 extended partition.
Check and make sure that there are no existing RAID devices running currently. The content of /etc/mdadm.conf file and result of cat /proc/mdstat should be empty, and no arrays should be found in config file or automatically.
Answer Y(es) when prompted with “warning: The existing disk label on /dev/sdb will be destroyed and all data on this disk will be lost. Do you want to continue?”
Send update to kernel:
partprobe /dev/sdb
Repeat the command for other drives, i.e. /dev/sdc and /dev/sdd, if applicable.
Partition the hard drive according to your preference.
In this tutorial, we will use the following command to create partitions that are identical to existing drive, /dev/sda:
sfdisk -d /dev/sda | sfdisk --force /dev/sdb
Repeat the command for other drives, i.e. /dev/sdc and /dev/sdd, if applicable.
Tip
If you’re using “fdisk” to manually create partitions, you can use the “sfdisk” command above to replicate the partition structures to others disks if you have more than 1 additional hard drives. For example, “sfdisk -d /dev/sdb | sfdisk –force /dev/sdc” will replicate partitions of /dev/sdb to /dev/sdc.
Changes partition type to Linux RAID autodetect. To do so, “fdisk” the specific hard disk. For example,
fdisk /dev/sdb
Then, issue t command:
Command (m for help): t
Partition number (1-5): 1
Hex code (type L to list codes): fd
Changed system type of partition 1 to fd (Linux raid autodetect)
Repeat the process for the rest of the partitions on the disk. Then, make the change permanent:
Command (m for help): w
Remove RAID for the new disks, just in case the RAID was set up on the “new” disks before:
RAID related modules have been loaded in kernel, but no RAID sets are configured.
Create RAID devices in degraded state because the one drive is missing, i.e. /dev/sda which is currently installed with OS and used to boot up. As CentOS and RedHat version 5.0 and 6.0 is using Grub 0.97 by default, “–metadata=0.9” is specified so that older version of superblock is used. Otherwise, Grub may respond with “filesystem type unknown, partition type 0xfd” error and refuse to install. In addition, mdadm will also sound a warning for boot array: this array has metadata at the start and may not be suitable as a boot device. If you plan to store ‘/boot’ on this device please ensure that your boot-loader understands md/v1.x metadata, or use –metadata=0.90. The parameter is not necessary with Grub2. The following syntax assumes that we’re building RAID10 arrays with 4 disks. Change to RAID1 if you only have 2 disks by changing the options to “–level=1” and remove the non-existent disk partitions.
When prompting whether to continue creating array, answer Y(es). Repeat the process to create RAID arrays for swap spaces and other partitions, if available.
Note
RAID array cannot be created on extended partition, with mdadm responds with /dev/sdbX is not suitable for this array.
Create a mdadm.conf from current RAID configuration:
mdadm --examine --scan >> /etc/mdadm.conf
Create the filesystems on the new RAID devices:
mkfs.ext4 /dev/md1 # You may want to use mkfs.ext2 for ext2 filesystem for /boot
mkfs.ext4 /dev/md2 # ext4 filesystem for / root
mkswap /dev/md3 # Swap space
Create the ext4 filesystem to any other new RAID arrays created.
Replace the device entries in /etc/fstab with the new RAID devices. To do so, firstly run:
blkid | grep /dev/md
It returns output with UUID of new software RAID devices looks like this:
In /etc/fstab, change the lines containing of various mount points to the UUID of corresponding new /dev/mdX new RAID filesystems, i.e. the value after “UUID=”. For example,
Leave the tmpfs, devpts, sysfs, proc and others untouched. Of course, if you know what you’re doing, or have a radically different filesystems, you can modify fstab as you like.
Update the initrd and rebuild the initramfs with the new mdadm.conf:
Note: Replace $(uname -r) with actual kernel version if the commands doesn’t work for you, especially on a LiveCD.
In /boot/grub/menu.lst, change the value of UUID or label entry for the kernel to UUID of / (root directory) on RAID array or /dev/md2 (change according if your /boot is mounted on different partition). For example:
Install Grub 0.97 on the MBR of all disks so that should one of the disks fails, the system should be able to boot. For this to happen, the following step has to be done::
Skip the hd2 and hd3 if you have only 2 hard drives.
We’re going to restart the server. Backup everything just in case server doesn’t come back, then issue:
reboot
The first part of configuring Linux software RAID support on currently running system has completed. If the server came back, continue with the following procedures to re-add the missing hard disk (e.g. /dev/sda which is running the system originally) to the RAID arrays. The following guide assumes that the remaining disk hasn’t added to RAID arrays is /dev/sda. Change if your device name if different.
After the server boots up, confirm the filesystems are mounted on the RAID arrays, i.e. /dev/md0, /dev/md1…./dev/md3.
Answer Y(es) when prompted with “warning: The existing disk label on /dev/sdb will be destroyed and all data on this disk will be lost. Do you want to continue?”
Delete all existing partitions on /dev/sda:
fdisk /dev/sda
Command (m for help): d
Partition number (1-5): 1

Command (m for help): d
Partition number (1-5): 2

Command (m for help): d
Partition number (1-5): 3

Command (m for help): d
Partition number (1-5): 4

Command (m for help): d
Partition number (1-5): 5

Command (m for help): w
The partition table has been altered!

Calling ioctl() to re-read partition table.
Syncing disks.
Remove any RAID on the disk:
mdadm --zero-superblock /dev/sda{1..9}
Send update to kernel:
partprobe /dev/sda
Copy the partition structure from /dev/sdb:
sfdisk -d /dev/sdb | sfdisk --force /dev/sda
Run:
fdisk -l
Ensure that all partitions which form the RAID arrays are of fd Linux RAID autodetect partition types (value under “Id” column). If it’s type 83 Linux, use fdisk, cfdisk or parted to change it to “fd”. For example:
Send update to kernel if there is any change.
partprobe /dev/sda
Add the partitions in /dev/sda to the respective RAID arrays to make the arrays complete (4 disks on RAID10 or 2 disks on RAID1):
When the recovery of all RAID arrays, perform a system restart.
reboot
When the system came back up and online, congratulations, you’re now running on software RAID.
After RAID is enabled with mdadm, the most important thing is to ensure that email alert notification system is working. Linux software RAID can monitor itself for any possible issue on the RAID arrays such as disk failure, and can send email notification when it found any possible errors.
To verify that email notification is working, issue the following command:
mdadm --monitor --test --oneshot /dev/md1
You should receive an email with the content of /proc/mdstat. If you do not receive the email, make sure that your system is able to send out email, and check the MAILADDR value in mdadm.conf. It should read something like:
LK is a technology writer for Tech Journey with background of system and network administrator. He has be documenting his experiences in digital and technology world for over 15 years.
Connect with LK through Tech Journey on Facebook, Twitter or Google+.


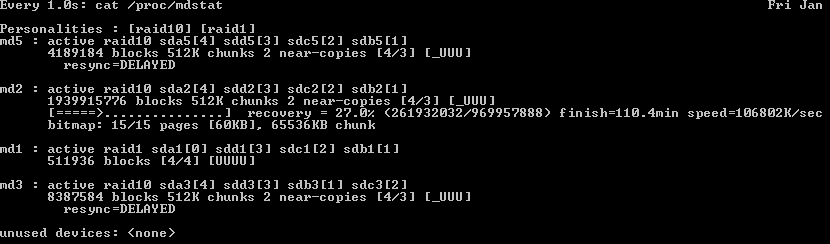 TipYou can continously refresh the content of /proc/mdstat file with the following command, which refreshes at 5 seconds interval:

")


