Decrypt & Convert Upgrade ESD to Create Bootable Windows ISO or WIM
Microsoft has switched to ESD (Electronic Software Download) file format to deliver installation files required to install and upgrade Windows operating system between major version through Windows Update, such as from Windows 8 to Windows 8.1, Windows 8.1 to Windows 10, between various builds of Windows 10 Technical Preview and Insider Preview released to Windows Insiders, and future beta builds or future versions of Windows OS.
Windows Update normally downloads and stores the required Windows install files on C:\$Windows.~BT folder. The main Windows OS files are stored in a file named Install.esd inside Source folder, which is more than 2 or 3 GB in size. An ESD file is essentially the encrypted or decrypted but highly solid compressed format of regular compressed WIM file format (Windows Imaging) which is normally included in a typical Windows ISO image.
The advantage is ESD file is that it’s more secure and smaller in size comparing with WIM file, making it faster to download and install. However, as ESD is encrypted and new, it’s not common in ISO, or when burned to DVD or USB flash drive.
More often than not, Microsoft does not usually provide bootable ISO images for each and every build or version of Windows released. So you will have to convert the ESD, either the Install.esd downloaded by Windows Update or ESD file manually download from Windows Update’s server, to ISO image.
The tutorial guides you on how to convert an ESD file to bootable ISO image.
Step 1: Get the ESD File
You can get the Windows ESD file through one of the following methods:
Windows Update downloads and stores the ESD for the version that it upgrades to as C:\$Windows.~BT\Sources\Install.ESD. The “$Windows.~BT” is a hidden folder, so you must turn on the Show hidden files and folders in File Explorer, or manually type in the directory name to browse it.
Note that you must let Windows Update completes the download to get the proper and complete Install.ESD, although you can skip the Install process if you wish. However, if you have completed the installation, the Install.ESD may be moved to C:\RecoveryImage\Install.ESD.
Download the ESD manually from Windows Update’s server (you can get download links of Windows Update transfer jobs including ESD), or from third party sources such as Mega, Google Drive, OneDrive, BitTorrent and other file sharing sites.
Step 2: Download ESD Decrypter Script
Thanks to abbodi1406 and others on MDL Forums, there is now an easy to use script named ESD Decrypter that automates the process to decrypt an encrypted ESD, convert to WIM or produce a bootable ISO image.
Download esd-decrypter-wimlib-23.7z, now updated to include a script to automatically update keys database.
Or better still, download updatable decrypt-release.7z which contains update_keys.cmd to automatically download and update key.
Note that the usability of ESD Decrypter tool to decrypt encrypted ESD depends on correct RSA key in use, which may be changed by Microsoft at any time. ESD can be in encrypted or decrypted state, where the later no RSA-crypto-key is required.
How to Get ESD Decryption RSA Cryptokey
To get RSA cryptokey to decrypt an encrypted ESD, let installation in Windows Update to start for at least a few second, and then open the following file with Notepad or other text editor, and the value of CryptoKey would be the ESD RSA decryption key:
C:\$Windows.~bt\sources\Panther\windlp.state.xml
Step 3: Prepare the ESD Decrypter and ESD File
Create a folder with simple path, such as C:\ESD.
Extract the ESD Decrypter files into the folder.
Copy the original ESD file into the folder.
Step 4: Run ESD Decrypter
Run the ESD Decrypter script, i.e. decrypt.cmd with Administrator credentials by right clicking on it and choose Run as Administrator.
Alternatively, you can either drag and drop the ESD file on decrypt.cmd; or enter the path to ESD if decrypt.cmd is run without ESD file in the same folder; or execute “decrypt.cmd DriveLetter:\path\ESDFileName”, replacing the DriveLetter:\path\ESDFileName with actual path to the ESD file.
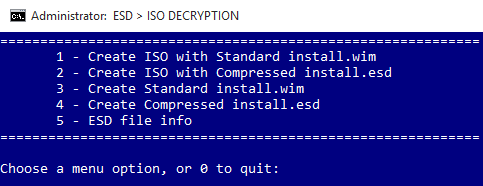
Press the number corresponding to one of the options available:
Create ISO with Standard install.wim – Convert ESD file to a regular ISO distribution that contains standard install.wim file.
Create ISO with Compressed install.esd – Create a ISO image with highly compressed install.esd file.
Create Standard install.wim – Convert ESD to WIM.
Create Compressed install.esd – Create compressed install.esd file, which can be used just like install.wim.
Decrypt ESD file only or ESD file info – Decrypt the encrypted ESD file or view decrypted ESD file info.
Thus, if you want to create an ISO image, choose option 1 to create a traditional ISO with install.wim file to install Windows, or option 2 to create an ISO image with install.esd to install Windows. Both ISO types can be used the same way to install Windows, including mount in virtual drive, burn to DVD or write to USB flash drive.
Note
DISM (Deployment Image Servicing and Management) can works only with WIM. It will fail with “source files not found” if you attempt to use it with ESD.
The process may take a while, sometimes more than an hour depending on option you chose and the hardware.
LK is a technology writer for Tech Journey with background of system and network administrator. He has be documenting his experiences in digital and technology world for over 15 years.
Connect with LK through Tech Journey on Facebook, Twitter or Google+.

")
")
")
")
