Disable and Turn Off System Restore (System Protection / Shadow Copy) in Windows
Whenever users install software program, drivers, updates, hotfixes and other system changing files, Windows operating system will create Restore Point by using System Restore, part of System Protection feature, where a snapshot and stored state of important system files are backed up and copied using Shadow Copy service, or more commonly known as VSS (Volume Snapshot Service or Volume Shadow Copy Service). It anything goes wrong such as driver not working or program causes instability to the system, users can easily rollback to the previous state.
If you pretty sure that you practice safe computing and can handle all disaster yourself, you can turn off and disable System Restore in Windows to release and reclaim space used by System Restore. But be warned that System Restore actually dependent on Volume Shadow Copy service as explained in the guide to change System Restore disk size limit using Command Prompt. When you disable System Restore on a particular drive in Windows, all disk space allocated to Volume Shadow Copy will be released, so not only System Restore is disabled, but the useful Previous Versions in Windows Vista, Windows 7, Windows 10 or other Windows OS versions will also not functioning.
Disable and Turn Off System Restore in Windows
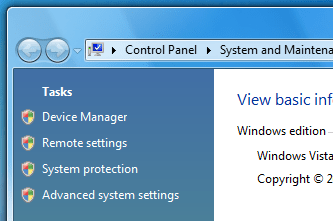
Right click on Computer (in Windows Explorer or Start Menu) then select Properties from contextual menu.
Alternatively, go to Control Panel -> System and Maintenance -> System.
In the left pane, click System Protection. If you are prompted for an administrator password or confirmation, type the password or provide confirmation.
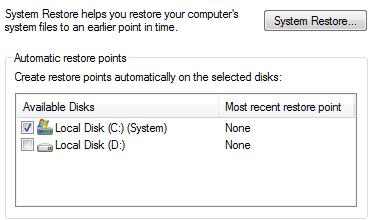
You will see a list of hard disk drives installed on your system, with checkboxes to the left. The check boxes with tick indicate that System Restore is on for that particular volume. So to to turn off System Protection for a hard disk, clear (untick) the check box next to the disk.
Depending on the version of Windows, either:
Uncheck the checkbox for the drive which you want to disable the System Protection.
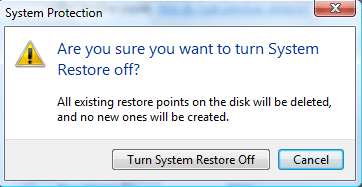
Click on Turn System Restore Off button on System Protection dialog box that appears. Finally, click OK and System Restore is now off.
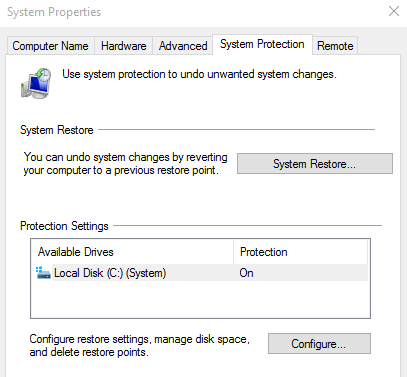
Select the drive which you want to disable the System Protection, then hit Configure button.
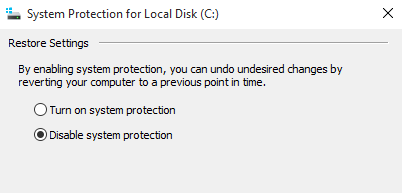
Under “Restore Settings”, select Disable system protection, and hit OK. Click or tap Yes when asked if you’re sure you want to turn of system protection on this drive, and the change takes effective immediately.
Note
To revert and enable or turn on System Protection for a hard disk drive, simply (depending on version of Windows) follow the same steps, select and tick the check box next to the disk and then click OK; or select Turn on system protection and hit OK.
LK is a technology writer for Tech Journey with background of system and network administrator. He has be documenting his experiences in digital and technology world for over 15 years.
Connect with LK through Tech Journey on Facebook, Twitter or Google+.
")
 in Windows 10")
 Backup Files in Windows")
 in Windows with ShadowExplorer")
 vs Recycle Bin in Windows")
