Enable or Disable Built-in Administrator Account in Windows 10 / 8.1 / 8 / 7 / Vista
In Windows XP, the built-in Administrator user account is automatically created with blank password (no password) during Out-of-Box-Experience (OOBE), and then the Administrator account is simply hidden from the view of normal users.
In Windows Vista, Windows 7, Windows 8, Windows 8.1, Windows 10 or later, the OS also creates a built-in “elevated” Administrator account with empty password by default. But this Administrator account is disabled by default in all clean installation and upgrade of Windows to Windows OS newer than Windows XP. The purpose for disabling the Administrator account is to enhance the security protection of the system. The enhanced security practice also applies to factory pre-installed Windows from original equipment manufacturers (OEMs) and system builders.
You can always enable and login with the default built-in Administrator account if you prefer (once enabled, Administrator account has no password until you change it). The following guide details several ways you can do it.
You must be signed in as an administrator (user account belongs to Administrators group) to be able to do the steps in this tutorial.
How to Enable and Activate Administrator Account in Windows 10, Windows 8.1, Windows 8, Windows 7 and Windows Vista
By default, the Administrator account does not have a password set (blank password). If you have to set a password while activating the Administrator account, use the following command:
net user administrator password /active:yes
Note
If you rename the built-in “Administrator” account to another name, change the command above accordingly. Likewise if you’re using Windows in other non-English language, which should be replaced with translated name.
Method 2
Enable the built-in Administrator account by using the Local Users and Groups MMC console (Microsoft Management Console) to change the properties of the Administrator account:
Tip
You can skip step 1 to 5 below by pressing the Windows + R keys to open the Run dialog, then type lusrmgr.msc, and click or tap on OK.
Open the MMC console by searching for MMC.
Go to File -> Add/Remove Snap-in.
Select Local Users and Groups under “available snap-ins” and click on Add.
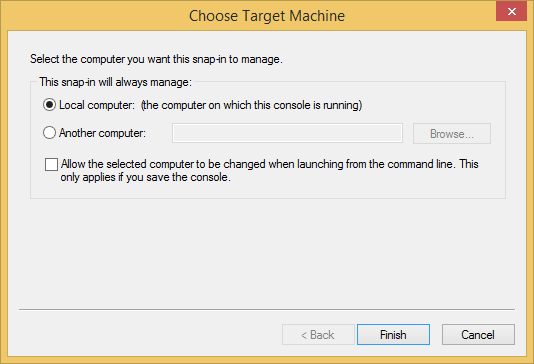
When prompted to “Choose Target Computer”, select Local computer and click Finish.
Note
If you’re attempting to manage remote computer, then choose “Another computer” and select your computer accordingly.
Click OK when done to open “Local Users and Groups”.
Expand Local Users and Groups and go to Users tree.
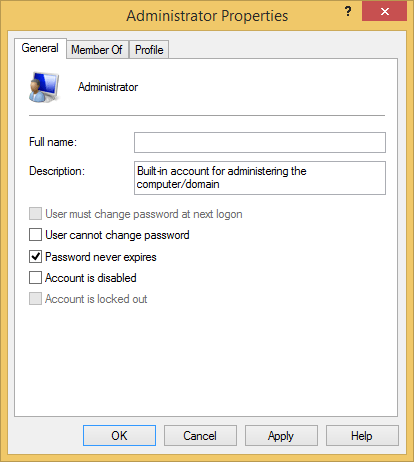
Right-click the Administrator account and select Properties. The Administrator Properties window appears.
On the General tab, clear the Account is Disabled box and hit OK.
You can enable the Administrator login access automatically during the unattended setup and installation of Windows, by using the AutoLogon of Microsoft-Windows-Shell-Setup unattended Setup setting. Microsoft-Windows-Shell-Setup contains elements and settings that control how the Windows operating system shell is installed on a destination computer.
To do so, set the AutoLogon setting to Administrator in the Microsoft-Windows-Shell-Setup component. This option will enable the built-in Administrator account in Windows, even if a password is not specified in the AdministratorPassword setting in UserAccounts element.
For fully automated procedure, system administrators can create an answer file by using Windows System Image Manager (Windows SIM) and other deployment tools, as shown in the sample below that will enable the Administrator account, specify an Administrator password, and automatically log onto the system.
Follow steps in method 2 above while enabling the Administrator account in Local Users and Groups app, but select the Account is Disabled box and hit OK to deactivate and disable the Administrator account
Method 3
Follow steps in method 3 above while enabling the Administrator account in Local Security Policy app, but select the Disabled radio button for Accounts: Administrator account status setting.
Method 4
Reset and remove all unique and customized account information including product activation status to return to end users first-run out-of-box experience (OOBE) by using sysprep.exe /generalize command. Sysprep (System Preparation Utility) is an integral part of the operating system and is always present in the C:\Windows\system32 directory, and thus can be invoked from the command line as shown below or via a GUI dialog box. To run it, execute any of the following command in command prompt or Run box.
The next time the computer starts, the built-in Administrator account will be disabled.
Above tricks work on most versions of Windows OS, including Windows Vista, Windows 7, Windows 8, Windows 8.1, Windows 10, Windows Server 2008, Windows Server 2008 R2, Windows Server 2012, Windows Server 2012 R2, Windows Server 2016 or later.
LK is a technology writer for Tech Journey with background of system and network administrator. He has be documenting his experiences in digital and technology world for over 15 years.
Connect with LK through Tech Journey on Facebook, Twitter or Google+.
 NoteIf you’re attempting to manage remote computer, then choose “Another computer” and select your computer accordingly.
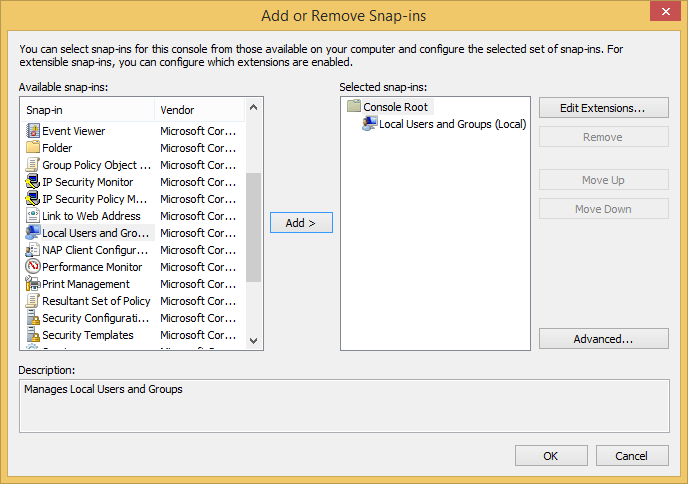


 in Windows 10 / 8 / 7 / Vista / XP")
 in Windows 10 / 8 / 7 / Vista / XP")