How to Add IP Addresses to Server with cPanel WebHost Manager (WHM)
cPanel WebHost Manager (WHM) allows system administrators or webmasters to easily add additional new IP address to the server or web host. If your dedicated server or VPS (Virtual Private Server) comes with extra IP addresses, and your web hosting provider does not assign and configure the IP addresses automatically onto the server, the following guide describes procedures and steps to add more IP addresses to the server.
Login to cPanel WebHost Manager (WHM) on the server.
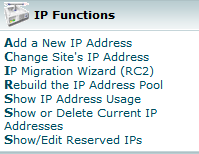
On the left pane, navigate to IP Functions menu, and then click on Add a New IP Address link.
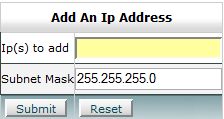
Enter the IP address in the IP(s) to add field. Although the link says A IP Address, you can easily submit multiple or more than one IP addresses to be added to the server at once. For more than 1 IP address, specify in Class C CIDR format or 192.168.0.1-254 format. For example, 192.168.4.128/25, 192.168.3.5-10, 192.168.99.55-230.
Alter the subnet mask default value of 255.255.255.0 to the valid value for the IP address(s) in the Subnet Mask field, if required. Normally this value will be provided by your hosting provider.
Click on Submit button (for cPanel 11) or Do it (for cPanel 10 or older).
cPanel will add each IP address per line into /etc/ips config file. You can now use the new additional IP addresses just added to host your websites.
Note that IPs are configured by using IPaliases cPanel startup script located in /etc/init.d/ipaliases. If you turn off the service (it’s enabled by default), cPanel won’t be able to manage the IPs automatically at system boot.
So, if you don’t see your new IP addresses after adding it, try to restart IPaliases service. Login to server OS shell via SSH, and run the following command:
LK is a technology writer for Tech Journey with background of system and network administrator. He has be documenting his experiences in digital and technology world for over 15 years.
Connect with LK through Tech Journey on Facebook, Twitter or Google+.