How To Mount and Access New Partition / Volume / Drive As Folder Path In Windows
When adding a new hard disk or create a new partition in Microsoft Windows operating system, typically users will normally assign a drive letter such as Local Disk (E:) to the new partition or volume. Beside normal way of allocating a drive letter, it’s also possible to assign a folder or directory (on partitions formatted as NTFS) to represent the hard disk drive, partition or volume too, eliminating eliminating the use of drive letter and enabling browsing the volume and partition contents as in folder, or path.
Mounting a partition or drive as a folder also provides a workaround way or trick to allow a partition to appear as part of C:\ root system drive. This hack is particular useful to expand the hard disk space size of C:\ or other system drive without having to use a new disk drive letter or switching drive to accommodate older program or application that must store and save data on installed drive, typically at system drive.
To mount partition or volume as a folder, users must first have or create a empty folder on a NTFS formatted file system that users want to assign or associate with the partition or volume. And it’s also possible to mount a partition, a volume or a hard disk drive which already assigned with a disk drive letter as folder too, allowing two ways to access the volume or partition via different drive or different folder. And it’s not necessary that only a hard disk (which whole hard disk been allocated as single partition) can be mounted as an empty NTFS folder, unused partition or empty space on existing disk can be mounted as NTFS folder too as long as users can create a new partition on it.
How to Mount a New Volume/Partition as Folder
Click on Start Menu, then select Run. Alternatively, press Win+R key to open Run command, and type DiskMgmt.msc to open Disk Management.
In Windows 8 / Windows 8.1 / Windows 10, you can also open Win+X Power Users menu, and select Disk Management.
Right click on the new hard disk or remaining unallocated space, and then select New Partition or New Simple Volume (in Windows Vista or later).
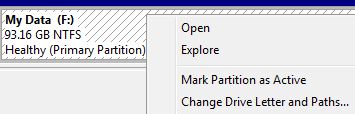
For the partition has been created, but not yet assigned any drive letter and paths, or partition that has been allocated with drive letter and path, right click on the partition and select Change Drive Letter and Paths.
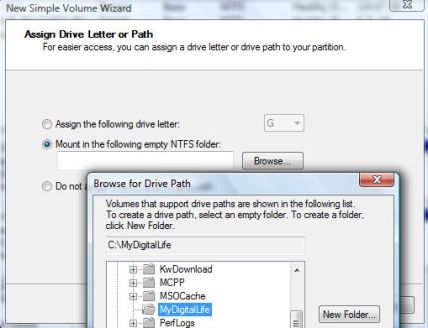
In the “New Simple Volume Wizard” or “New Partition Wizard”, follow the instructions on screen such as selecting the size of the new partition, until the the Assign Drive Letter or Path screen.
For existing volume/partition, click on Add button to add a new path instead.
Select Mount in the following empty NTFS folder radio button, and then select Browse… button.
For existing volume/partition, the “Mount in the following empty NTFS folder” is automatically selected. Users cannot assign more than one drive letter to a partition, but can assign many paths (folders) to a partition.
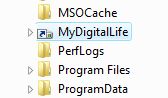
Select an empty folder that you want to mount this new partition. Click on New Folder to create a new directory if needed. Once selected the mounting folder, click OK button.
For existing partition already with drive letter, process is completed and users can now open Windows Explorer to browse the partition content in the mounted folder.
Else, back in the wizard, continue to follow instructions on screen to complete the wizard by selecting file system, allocation unit size, volume label, decide whether to perform quick format or whether to enable file and folder compression. Wait for the disk formatting to complete too. After process completed, a folder is linked to the partition/volume.
As mentioned, users can assign many folder path to a single volume or partition. Users can also remove the relationship of folder mount point with volume at any time, or change back to a drive letter. Even already mounted on a folder path, a drive letter can still be assigned to the partition too. All these administrative operations can be done on the Disk Management. Best of all, changing drive letter or folder paths of a volume will not delete the data on the drive.
LK is a technology writer for Tech Journey with background of system and network administrator. He has be documenting his experiences in digital and technology world for over 15 years.
Connect with LK through Tech Journey on Facebook, Twitter or Google+.


 in Windows 10")

 Size in Windows")


