Install & Set Up Linux Web Server with Virtualmin Control Panel
Virtualmin is an open source domain hosting and web server control panel built on top of Webmin, a web-based system administration tool for Unix and Linux operating systems. Virtualmin provides and simplifies the tasks to multiple domains and virtual servers (aka accounts), with the ability to administer various services critical to a web host under one web-based interface, such as Apache, Nginx, PHP, MySQL / MariaDB, PostgreSQL, DNS, FTP, SSH, SSL, Mailman, Git, spam filtering, virus scanning, DAV, mailboxes, host networking, backup, restore and etc.
As Virtualmin is powerful yet available for free under GPL license, it has became a popular choice as the alternative control panel to commercial cPanel and DirectAdmin.
The easiest way to install Virtualmin is by starting from a freshly installed server, i.e. on a server that has nothing else installed, as Virtualmin automated install script is capable of installing full Virtualmin LAMP GPL stack such as Apache, PHP, MySQL, Postfix and other dependencies. The server can be a dedicated (physical) server or a VPS (Virtual Private Server or cloud server). If you’ve already installed some applications on the server, reset or rebuild the server to a clean state with minimal or basic configuration.
The tutorial works on most newer version of CentOS, Red Hat Enterprise Linux, Scientific Linux 7, Debian, Ubuntu, OpenSolaris and Solaris (details of OS support available here), as we make use of the Virtualmin automated installation to deploy the server quickly.
Requirements
Freshly installed OS
Server’s host name is a fully qualified domain name (FQDN), such as “server.techjourney.net”, and ensure that the DNS is correctly setup to point the domain name to the server’s IP address.
To check the FQDN of your server, use the following command:
$ hostname -f
To change host name of your server, use the following command (replace with actual host name):
$ sudo hostname servername.example.com
Ensure that all packages is up to date by performing an update. For example, in RHEL, Fedora or CentOS, you can use the following command to update all the installed packages:
$ sudo yum -y update
Ensure that Perl is installed. In RHEL, Fedora or CentOS, you can use the following command to install Perl:
sudo yum -y install perl
Ensure that wget is installed. In RHEL, Fedora or CentOS, you can use the following command to install Perl:
sudo yum -y install wget
Virtualmin Installation
SSH to the IP address of the server and login as root or user with privileged sudo access.
If you’re logging in as root, sudo command is unnecessary.
Download Virtualmn installer script with the following command:
Install the Virtualmin with Webmin with the following command:
sudo sh install.sh
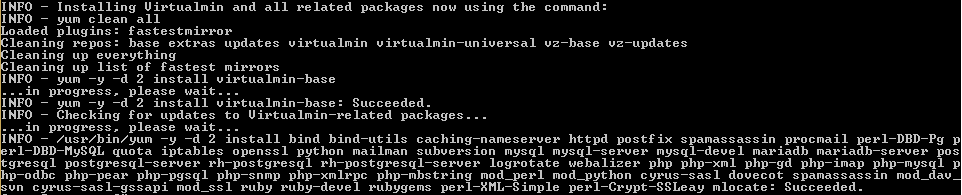
You’ll be presented with information about installing Virtualmin with the script. Press Y followed by Enter to start the installation.
You should see the following status as shown in figure below when the installation completed and succeeded.
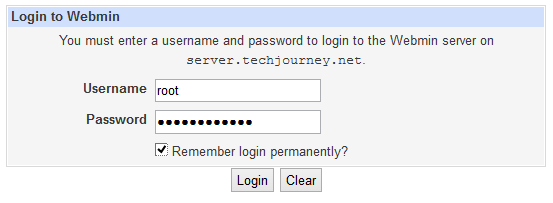
Access the Virtualmin control panel with the following URL:
https://your.server.com:10000/
Replace “your.server.com” with your server’s host name.
Login with root and the root password.
Virtualmin Post-Installation Wizard
After logging into Virtualmin/Webmin for the first time, the Post-Installation Wizard is displayed, which allows you to configure Virtualmin optimally for your system based on your system’s memory and CPU power.
Click Next to start.
The wizard has descriptions that explain what each setting does. Below is more detailed information about some of the settings in the wizard.
Database servers
Memory use
Preload Virtualmin libraries?
Load Virtualmin libraries into memory. Disable if your host is short of memory. Virtualmin will still work without preloading.
Run email domain lookup server?
Run a daemon that assists in determining what Virtual Server an email belongs to. If disabled, a process is temporarily launched for each incoming email to determine the same information. Disable if you’re not using the host as mail server.
Virus scanning
Run ClamAV server scanner?
Load clamd in the background to scan incoming emails. Recommended to enable if you’re expecting a lot of emails coming through, and has sufficient memory.
Spam filtering
Run SpamAssassin server filter?
Similar to ClamAV, enable if you’re expecting lots of emails and has sufficient memory, as start/stop cycle of virus and spam scanning may put a dent in your server performance.
Database servers
Run MySQL database server? and Run PostgreSQL database server?
Most web applications will require at least a database server, which is normally MySQL (Virtualmin uses MariaDB in-place if that’s what the system supports). Enable or disable the DB support based on usage scenario for your server.
Run MySQL database server? and Run PostgreSQL database server?
Most web applications will require at least a database server, which is normally MySQL (Virtualmin uses MariaDB in-place if that’s what the system supports). Enable or disable the DB support based on usage scenario for your server.
The rest of the steps in the wizard provides basic information to Virtualmin to set up a working web server.
If you selected MySQL, you will be asked to enter a root password for the MySQL server. Enter one, or click Next to leave blank.
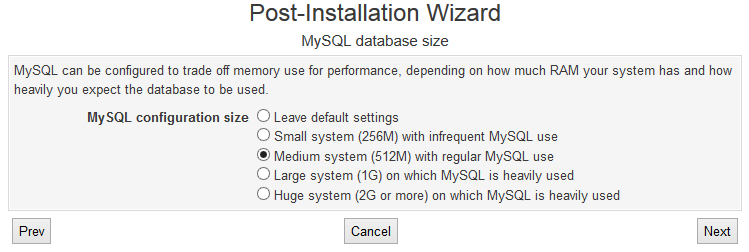
Next up is MySQL configuration size. It’s recommended to select configuration that matches the size of server’s available RAM. Normally, the Virtualmin is smart enough to select the matching one by default. Click Next once you made your selection.
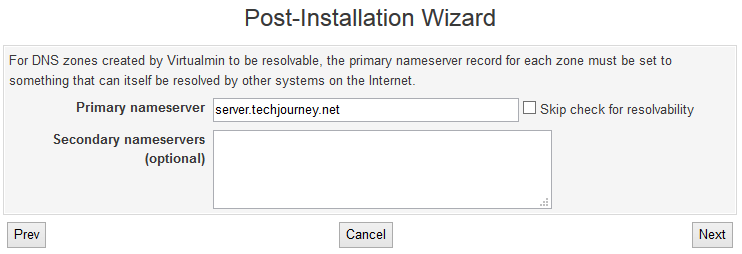
If you’re planning to manage the DNS zones with Virtualmin, enter the primary and/or secondary nameservers on the next screen. The name servers entered should be resolvable (configured with A record). If the DNS records for name servers are not yet ready, select the Skip check for resolvability. Then, click Next
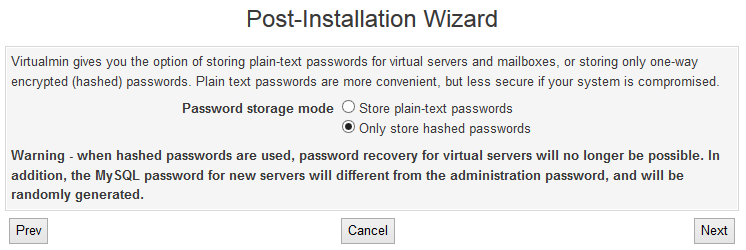
Last but not least, Virtualmin gives you the option to determine how secure the passwords for virtual servers and mailboxes to be stored. It’s recommended to choose Only store hashed passwords which encrypts the password for security reason, so that your passwords couldn’t be easily retrieved if the server is hacked or compromised.
Once finished, an ‘All Done’ page is shown. Click Next.
On the main page, click on Re-check and refresh configuration button in the yellow bar on the top of the screen to verify Virtualmin’s configuration is working. If error is returned, follow the instructions to resolve it, and then re-check and refresh your configuration until all errors are gone.
That’s it. You now have a working web host powered by Virtualmin control panel. You can now proceed to add virtual server, which represents a website on a domain.
LK is a technology writer for Tech Journey with background of system and network administrator. He has be documenting his experiences in digital and technology world for over 15 years.
Connect with LK through Tech Journey on Facebook, Twitter or Google+.


 PHP Versions in Virtualmin")
