Internet Connection via Ethernet Network Card or Modem Dial-up
Sufficient disk space
Procedure:
Download latest version of FreeBSD. Select ISO image download that suits your system architecture platform (for example, machine on Intel Pentium-IV or AMD AthlonXP is based on i386, while AMD Opteron is amd64 architecture) by clicking on corresponding [ISO].
Download 6.0-RELEASE-i386-disc1.iso, or any other similar file. (Disc 1 is sufficient to install a fully working FreeBSD box)
Burn the file (ISO image) to a CD disc (refer to your CD-RW or DVD-RW manual if you not sure of how to burn a image file).
Insert the newly created FreeBSD CD to the computer that you want to run as web server and power on the computer.
If you want to use multiple operating systems on the computer to co-exist, or your system already has operating system installed, you must free up a primary partition for FreeBSD installation. You can modify partition with fdisk on DOS or Windows, FIPS and PResizer from tools directory in FreeBSD CD, or with third-party software like PartitionMagic that is able to modify NTFS partition.
Boot from CD when computer starts up. If booting from CD capability is not enabled or has lower priority than hard disk, change it in BIOS.
Once FreeBSD boots up, you will see a menu titled ‘sysinstall Main Menu’ that contains all the installation options.
Select ‘Standard’ and press Enter.
Press Enter (or Space) when shown the following message:
                                 Message
 In the next menu, you will need to set up a DOS-style ("fdisk")
 partitioning scheme for your hard disk. If you simply wish to devote
 all disk space to FreeBSD (overwriting anything else that might be on
 the disk(s) selected) then use the (A)ll command to select the default
 partitioning scheme followed by a (Q)uit. If you wish to allocate only
 free space to FreeBSD, move to a partition marked "unused" and use the
 (C)reate command.
                                [  OK  ]

                      [ Press enter or space ]
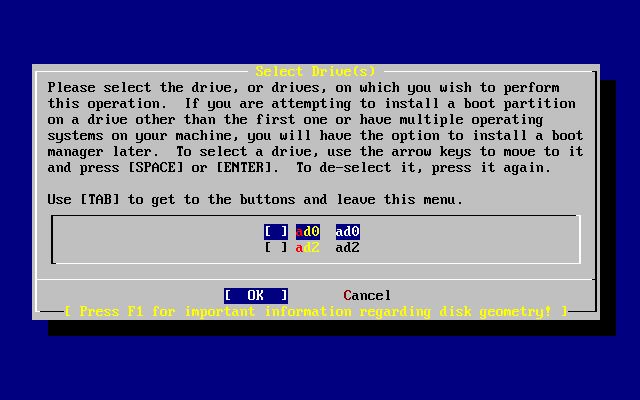
If you have more than 1 disk drives detected, FDISK will prompt you to select which disk drive you want to use. Just select accordingly (For the purpose of this tutorial guide, select the first primary hard disk).
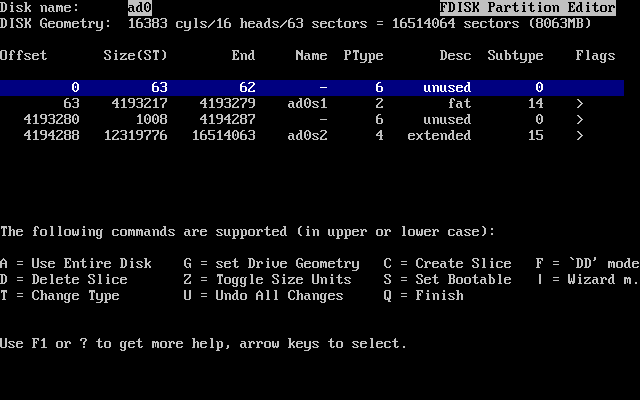
You will be shown FDISK Partition Editor. If you already has some partitions defined, your screen will typically shown like below:
Depending on how is the layout of your current hard disk, you may need to press D to delete a or some partitions to make room for FreeBSD partition. You can create a partition by pressing C. If your hard drive is empty and you would like to use entire disk for FreeBSD, press A. When done, press Q to finish and exit the FDISK process.
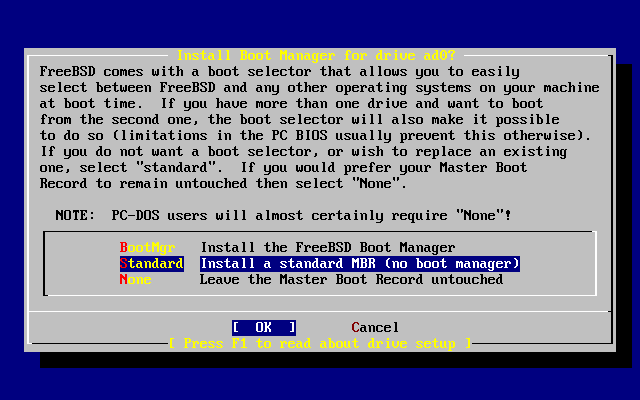
Next, a boot manager needs to be installed. You can select either BootMgr or Standard (Standard will suffice if FreeBSD is going to be the only operating system on this machine and it’s installed on the first hard disk).
Press Enter or Space when shown the following message:
                                 Message
 Now, you need to create BSD partitions inside of the fdisk
 partition(s) just created. If you have a reasonable amount of disk
 space (200MB or more) and don't have any special requirements, simply
 use the (A)uto command to allocate space automatically. If you have
 more specific needs or just don't care for the layout chosen by
 (A)uto, press F1 for more information on manual layout.

                                [  OK  ]
                          [ Press enter or space ]
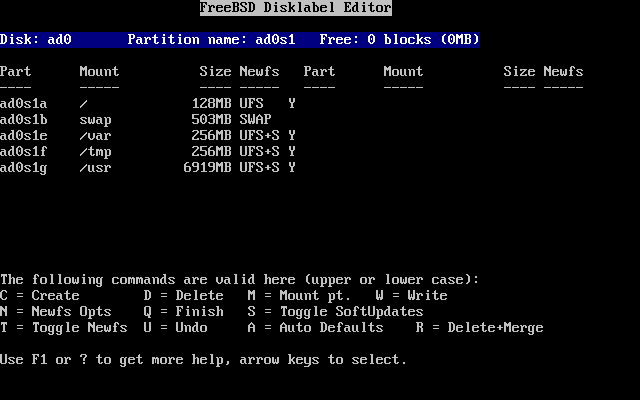
At FreeBSD Disklabel Editor, press A to let FreeBSD automatically creates the partitions and set the partitions to default sizes.
Note: /var will contains all log files, mail files, database files and etc. If you’re running FreeBSD as http web server or ftp server, the default size of /var is most likely not enough in future. You will need to increase the size of /var now by reducing the size of /usr. To do this, scroll to /usr and press D to delete /usr partition. Then scroll back to the first row (where specified free space available), press C, then key in your desired and reduced amount of blocks or space to allocate to /usr partition, select FS (A file system) and key in /usr as mounting point. Repeat the same process for /var, with increased blocks or space allocation.
Press Q when done to exit.
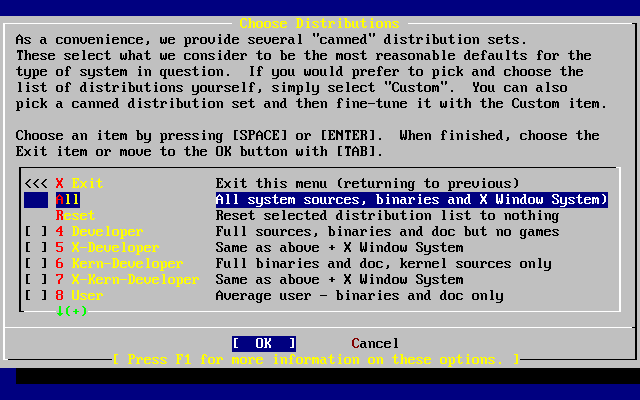
At Choose Distributions screen, select Developer or User (if you don’t want the sources).
Select [Yes] with arrow keys and press Enter to install FreeBSD Ports Collection when prompted. This allows easy installation of Apache, MySQL and PHP later.
                         User Confirmation Requested
 Would you like to install the FreeBSD ports collection?

 This will give you ready access to over 13,300 ported software packages,
 at a cost of around 440 MB of disk space when "clean" and possibly much
 more than that if a lot of the distribution tarballs are loaded
 (unless you have the extra CDs from a FreeBSD CD/DVD distribution
 available and can mount it on /cdrom, in which case this is far less
 of a problem).

 The Ports Collection is a very valuable resource and well worth having
 on your /usr partition, so it is advisable to say Yes to this option.

 For more information on the Ports Collection & the latest ports,
 visit:
     http://www.FreeBSD.org/ports

                              [ Yes ]     No
After returning to Choose Distributions screen, scroll to Exit with arrow keys and press Enter.
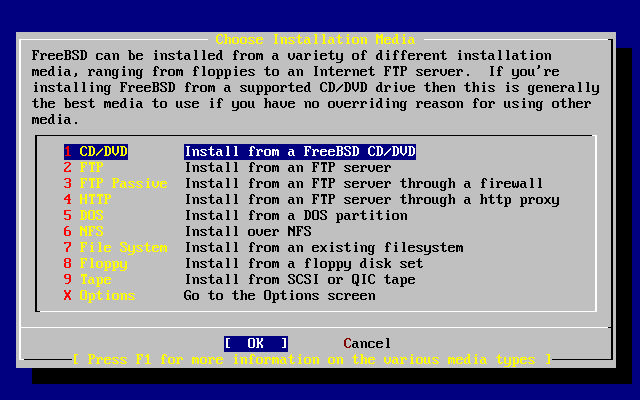
Select CD/DVD when prompted to Choose Installation Media.
Note: If your FreeBSD Installation CD is too old, you can choose to install via FTP, which will fetch and download the latest build release.
Configuration of FreeBSD has been set and installation can be started. Commit to the installation of FreeBSD when prompted.
                       User Confirmation Requested
 Last Chance! Are you SURE you want to continue the installation?

 If you're running this on a disk with data you wish to save then WE
 STRONGLY ENCOURAGE YOU TO MAKE PROPER BACKUPS before proceeding!

 We can take no responsibility for lost disk contents!

                             [ Yes ]    No
Warning: All data on the hard disk may be lost! The hard disk will be re-partition and re-format during installation.
After installation is completed, the following message will appears:
                               Message

Congratulations! You now have FreeBSD installed on your system.

We will now move on to the final configuration questions.
For any option you do not wish to configure, simply select No.

If you wish to re-enter this utility after the system is up, you may
do so by typing: /stand/sysinstall .

                                 [ OK ]

                      [  Press enter to continue  ]
Press Enter to proceed to post-installation configuration.
LK is a technology writer for Tech Journey with background of system and network administrator. He has be documenting his experiences in digital and technology world for over 15 years.
Connect with LK through Tech Journey on Facebook, Twitter or Google+.