Remote Desktop is a multi-channel protocol that allows a user to remote access or connect to a computer which has enabled Remote Desktop server or Remote Desktop Services from another remote computer, through Local Area Network (LAN), Wide Area Network (WAN) or Internet by using Remote Desktop Connection client program. Microsoft Remote Desktop Protocol (RDP) server application can be found pre-installed on Windows Server 2003, Microsoft Windows XP Professional, Microsoft Windows XP Media Center Edition (MCE), Microsoft Windows XP Tablet PC 2005 Edition, Windows Vista Ultimate, Windows Vista Business Edition, and equivalent editions of later Windows OS such as Windows 7, Windows 8, Windows 8.1, Windows 10, Windows Server 2008, Windows Server 2012 and so on. By default, Remote Desktop is using port 3389 TCP (UDP to stream audio redirection) as the listening port for any incoming Remote Desktop connections.
Although Remote Desktop Services server is using the default listening port of 3389 TCP and UDP, it’s possible to modify or change the listening port of Remote Desktop to another port. It’s especially useful when the remote computer is behind firewall which doesn’t allow incoming and outgoing connections other than standard ports (Windows Firewall in Windows XP Service Pack 2 (SP2) or later will automatically configure and open required ports when user enable Remote Desktop to allow Remote Desktop connections to the computer, if “Don’t Allow Exceptions” is not selected. Else, user will need to manually open the Remote Desktop port in Internet Connection Firewall on Windows XP SP 1 or earlier), or users unable to configure the port forwarding for Remote Desktop if they’re behind firewall or router’s NAT.
How to Change the Listening Port for Remote Desktop
Microsoft has a Knowledge Base article KB306759 that details how to modify and change the Remote Desktop listening port by changing registry value.
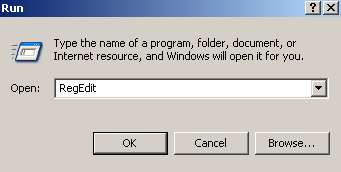
Start Registry Editor by clicking on Start -> Run, and type in regedit in the Run text box, and then press Enter or click OK.
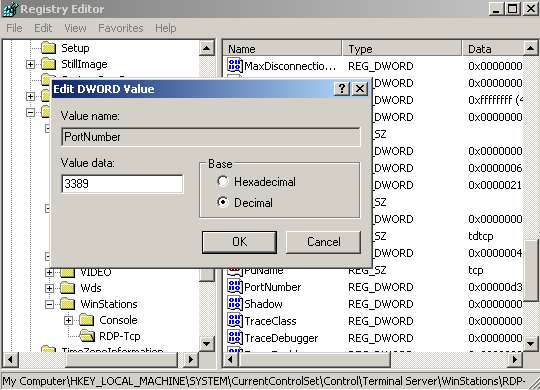
Locate the registry entry PortNumber in the right pane.
Right click on PortNumber and choose Modify (or select PortNumber, then click on Edit menu and select Modify).
On the Edit DWORD Value window, click on Decimal.
Type in the new port number on the Value Data text box.
Click OK when done.
If you don’t want to mess or modify in the Windows registry yourself, IntelliAdmin has a small free utility tool Remote Desktop Port Change (RDPRemotePortChange.exe) that allows users to change the Remote Desktop listening port on local computer or on remote computer across the LAN.
To change listening port for Remote Desktop for local PC (the computer that you’re using now), simply select Local System, or select Remote Computer for other computer and key in the desired computer name or IP plus authentication user name and password to change the listening port. Configure the required settings i.e. the new port number for Remote Desktop, and whether to reboot the PC after the change, and simply press Submit.
Note that Remote Assistance feature in Microsoft Windows XP may not work correctly if the the listening port of Remote Desktop has been changed. Beside, when want to connect or remote control this particular computer with non standard listing port by using the Remote Desktop connection from remote computer, the port number must be specified together with computer host name or IP address to connect to that specific port.
LK is a technology writer for Tech Journey with background of system and network administrator. He has be documenting his experiences in digital and technology world for over 15 years.
Connect with LK through Tech Journey on Facebook, Twitter or Google+.


")
 via Registry in Windows 10/8/7/2016/2012/2008/XP")

")
 Client 6.0 for Windows XP and 2003")

")