Tweak Windows Virtual Memory PageFile.sys (Change or Disable Paging File Size)
Memory or RAM is very important for normal operating of computer, as all computer programs and processes will have to execute through system memory. If user is running too many applications, especially resource intensive large programs that consume huge amount of memory, the memory will be used up and causing system to be running out of memory. To prevent instability and possible system halt due to insufficient memory, Windows operating system, including Windows Vista, Windows 7, Windows 8, Windows 8.1 and Windows 10, makes use of virtual memory technology.
Virtual memory works by allowing memory to be physically fragmented and overflown on to disk storage space while a software program still assuming that it’s running smooth without problem on a contiguous working memory. Windows OS accesses the needed memory as virtual memory in page file (pagefile.sys) on local system drive, which used to store page cache, and swap or transfer unused inactive memory space to ordinary disk file. The default location of the page file is in the root directory of the partition where Windows is installed.
Virtual memory or paging implementation in Windows ensures that the operating system can properly handle and open large set of data that does not fit into physical memory. As a result, the paging file in Windows can grows in size over time. However, user can tune and configure Windows to use free space on any available drives for page files storage, set a minimum and maximum size allowed for the paging files, or simply turn off virtual memory paging feature. The following guide will show you how to tweak virtual memory settings in Windows by setting the size of paging file (pagefile.sys).
Open Control Panel -> System and Maintenance or System and Security (in Windows 10) -> System.
In the left “Tasks”, click on Advanced System Settings.
You should come to “Advanced” tab. In “Performance” section, click or tap on Settings button.
Click or tap on Advanced tab.
In the “Virtual Memory” section, click or tap on Change button.
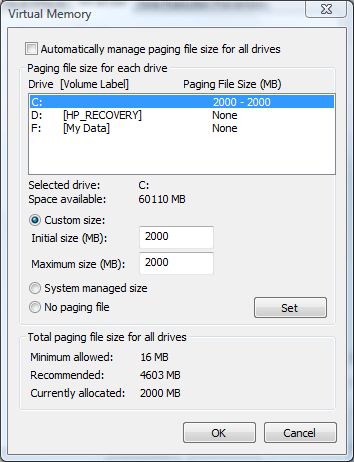
By default, “Automatically manage paging file size for all drives” setting is selected so that Windows system can manage the paging file without user’s interruption. If you want change the paging file size, move the pagefile.sys to another drive, or disable virtual memory paging, uncheck the check box of Automatically manage paging file size for all drives.
Select and highlight the appropriate drive that users want to change the paging file settings under the box of “Drive [Volume Label]”.
To fix a permanent size for the paging file, click on Custom size button, and set the values of Initial Size (MB) and Maximum Size (MB). Both values can be of same size to make the size of pagefile.sys static and permanent. Then click or tap on Set button.
System managed size is useful for users who do not want pagefile.sys to locate on system drive root and want to move its storage location to another drive, but still want Windows to dynamically manage and allocate the drive space for the paging usage.
To move the paging file to another drive, click or tap on No paging file radio button, and click or tap on Set button. Then select a different drive to set a new pagefile.sys with custom size or system managed size.
To disable paging file or virtual memory, simply set no paging files on all drives.
LK is a technology writer for Tech Journey with background of system and network administrator. He has be documenting his experiences in digital and technology world for over 15 years.
Connect with LK through Tech Journey on Facebook, Twitter or Google+.
 Maximum Supported RAM Physical Memory Limit")


 vs 64-bit (x64) Windows Vista")