eMule is a popular peer-to-peer (p2p) file sharing application in Windows platform for eDonkey and Kad networks. Due to tighten security and permission control in Windows Vista, coupled with new virtualization system, although eMule can install properly in Vista, eMule users may run into some problems such as unable to find finished downloaded incoming files, low ID, slow download speed, no minimize to tray button, downloads stuck incomplete at 99% and the famous “EventID 4226: TCP/IP has reached the security limit imposed on the number of concurrent TCP connect attempts” in Event Viewer error. Here’s a few tricks to avoid all these problems.
Update: eMule 0.48a has fixed some of these problems.
Download latest version of eMule (currently at v0.47c or later). All future version of eMule later than version 0.47c will automatically support Windows Vista with full compatibility.
Install eMule out of the protected “Program Files” directory. By default, “Program Files” directory where all the programs normally are stored is protected against unauthorized write access, and Vista will redirect any write access to a virtual directory. This mechanism will affect eMule as its configuration files as well as downloads are stored there. The easy way out is by installing eMule in another folder outside to “Program Files”, such as “C:\eMule”. To do this, change the path installer suggests.
If you don’t want to install eMule in different location, the alternative is to change the folders storing incoming files and temporary files to an unprotected location. Vista has a default Downloads folder which is suitable to be assigned to eMule. To do so, open the Options page in eMule, select “Directories”, and then change “Incoming files” (or browse to the location or any place you like) to C:\Users\User Name\Downloads\ and “Temporary files” to C:\Users\User Name\Downloads\Temp. Replace User Name with the user ID used to log on to Vista.
To solve the issue eMule hitting the maximum half open concurrent connection limit in Vista, open the Options page in eMule, select “Extended” and then change “Max. half open connections” from 50 to any value between 1 to 9. Alternatively, download the tcpip.sys patch for Vista to unlock the limit.
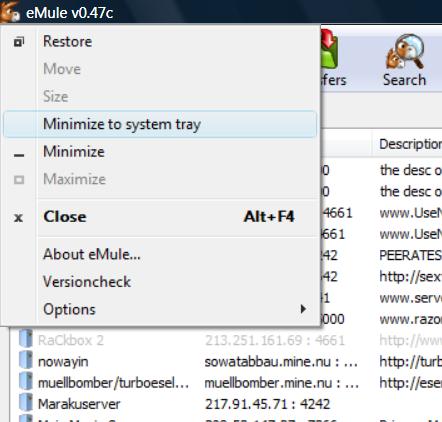
If you can’t see the minimize to tray button on some themes, it’s still possible to minimize eMule window to tray by clicking on system menu (the eMule icon on the top left corner of program window), and then select “Minimize to system tray”.
Alternatively, open Options page, select Display, and then enable (tick) the “Minimize to tray” setting to make all minimize action on standard button automatically minimize eMule to system tray.
It’s also possible to force eMule to run with highest execution level with full administrator’s rights so that eMule is allowed to write files to where it wants to without restriction. To do so, copy and paste the below code to a text editor (i.e. Notepad), and save the file as emule.exe.manifest inside the same directory with installed location of eMule.exe.
LK is a technology writer for Tech Journey with background of system and network administrator. He has be documenting his experiences in digital and technology world for over 15 years.
Connect with LK through Tech Journey on Facebook, Twitter or Google+.


")
")


