Microsoft Teams is a unified communication and collaboration platform that combines workplace chat, video meetings, files storage, and application integration into one hub. Microsoft Teams is now automatically installed by default by most plans of Office 365, and it also includes the notorious Teams Machine-Wide Installer MSI, that deploys the Teams app to each and every users who log on to the device.
Once installed, the “Welcome to Microsoft Teams” screen greets you on every system startup until you decide to login with a Microsoft Account or organization email that subscribes to an Office 365 plan with Teams, or until you change its settings to do no auto-start Teams.
Even you uninstall and delete Microsoft Teams from Settings and/or Control Panel, Microsoft Teams may just comes back and launches on every system restart, as if Teams magically keeps reinstalling itself on system boot. This auto installation feature of Teams MSI is designed as such though, as Teams actually has two components. Firstly, the actual Teams application itself and secondly, Teams Machine-Wide Installer MSI.
Teams Machine-Wide Installer is designed to install a copy of Teams app in each and every user’s AppData folder upon login. If a user already has the Teams app installed in the AppData folder, the MSI installer will skip the process for that user. In a standard deployment, the MSI installer will check if the user has uninstalled Teams from the user profile and if so, stop re-deploying Teams app again. In actual, the tracking process may not be working as intended, causing the MSI installer to continue installing Teams app again after uninstalling it.
Thus, if you are not using Microsoft Teams and want to completely and permanently remove and uninstall Microsoft Teams, you need to uninstall two items for all users on a machine to fully uninstall Teams. The following tutorial guides you on how to properly uninstall Teams.
- Quit Teams, including from Teams icon on the notification area of Taskbar (right click and select Close window).
- Open Settings.
- Go to Apps.
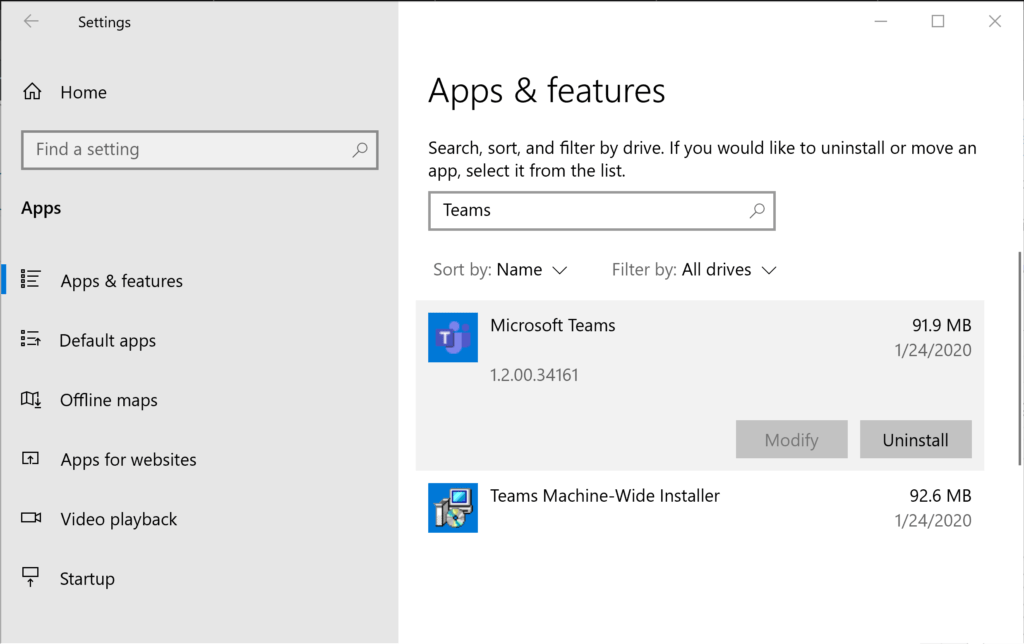
- Under Apps & features, search for Teams.
- Select Microsoft Teams, then select Uninstall.
- Confirm when prompted that this app and its related info will be uninstalled by selecting Uninstall again.
- Select Yes when prompted by User Account Control (UAC) asking do you want to allow this app to make changes to your device.
- Repeat step 5 – 7 for Teams Machine-Wide Installer.
If you are advanced user who is comfortable with PowerShell scripting, you can use the Microsoft Teams deployment clean up PowerShell script provided by Microsoft to automate the removal of Teams app and Teams Machine-Wide Installer MSI.
<#
.SYNOPSIS
This script allows you to uninstall the Microsoft Teams app and remove Teams directory for a user.
.DESCRIPTION
Use this script to clear the installed Microsoft Teams application. Run this PowerShell script for
each user profile for which the Teams App was installed on a machine. After the PowerShell has
executed on all user profiles, Teams can be redeployed.
#>

$TeamsPath = [System.IO.Path]::Combine($env:LOCALAPPDATA, 'Microsoft', 'Teams')
$TeamsUpdateExePath = [System.IO.Path]::Combine($env:LOCALAPPDATA, 'Microsoft', 'Teams', 'Update.exe')

try
{
    if (Test-Path -Path $TeamsUpdateExePath) {
        Write-Host "Uninstalling Teams process"

        # Uninstall app
        $proc = Start-Process -FilePath $TeamsUpdateExePath -ArgumentList "-uninstall -s" -PassThru
        $proc.WaitForExit()
    }
    if (Test-Path -Path $TeamsPath) {
        Write-Host "Deleting Teams directory"
        Remove-Item -Path $TeamsPath -Recurse

    }
}
catch
{
    Write-Error -ErrorRecord $_
    exit /b 1
}
That’s it. Teams is uninstall and will not automatically reinstall itself on next reboot. Do note that if you reinstall or perform an online repair of Office, Teams will be included.

