- Logon to Windows with an Administrators group user account.
- Go to Control Panel -> System and Maintenance -> Device Manager.
Alternatively, right click on Computer or This PC in Windows Explorer / File Explorer, and select Properties. Then click on Device Manager on the left Tasks pane.
- Expand the Disk drives, and find the SATA disk installed on the system.
- Double click on the SATA HDD or SDD device; or right click on the entry then select Properties.
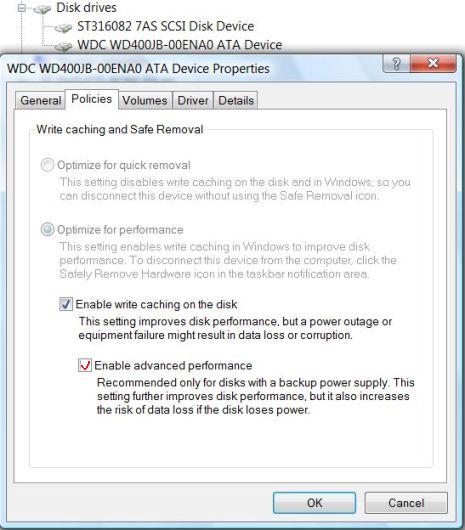
- Click on Policies tab.
- Tick the check box of Enable advanced performance or Better performance (default) nested under Enable write caching on the disk to enable the SATA disk performance improvement. You may also have to select “Optimize for performance” instead of “Optimize for quick removal” or “Better performance (default) instead of “Quick removal” if it’s not selected.
This option is only selectable on SATA hard disk, else if using PATA or IDE hard disk, you won’t see the options, or the settings are grayed out or disabled. As pointed out in the illustration, enabling of advanced performance will hold more writable data in the memory cache to further improve disk performance, so it’s recommended only for disks with a backup power supply, such as system protected by UPS (Uninterruptible Power Supply) or notebook and laptop computer with charged cell battery pack to fall back. This configuration will increase the risk of data loss if the disk loses power.
- Click OK, then exit from Device Manager.
Improved hard disk speed and performance will generally help to increase the system speed and improve performance of Windows.


