SNMP (Simple Network Management Protocol) is an internet protocol used in network management systems to monitor network-attached devices such as computers, servers, routers, switches, gateways, wireless access points, VoIP phones, and etc. for conditions that warrant administrative attention.
SNMP provides management data in the form of variables on the managed systems, which describe the system configuration parameter or current status value. These variables can then be read and queried (or sometimes set or write) by managing applications.
Windows system, including Windows XP, Windows Vista, Windows 7, Windows Server 2003, Windows Server 2008 (R2), Windows 8, Windows 8.1, Windows Server 2012 (R2), Windows 10, Windows Server 2016, either does not have SNMP service installed by default, or does not turn on SNMP service by default, or does not configure SNMP service by default, thus users need to manually install, enable or configure SNMP service before they can monitor the system via SNMP.
Note that you must be logged on as an administrator or a member of the Administrators group in order to complete this procedure. If your computer is connected to a network, network policy settings may also prevent you from completing this procedure.
How to Install and Enable the SNMP Service
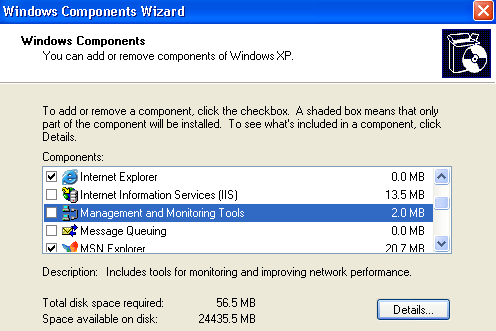
- In Windows XP and Windows Server 2003, click Start button, then go to Control Panel and run Add or Remove Programs applet. On Add or Remove Programs dialog, click Add/Remove Windows Components to open “Windows Components” wizard.
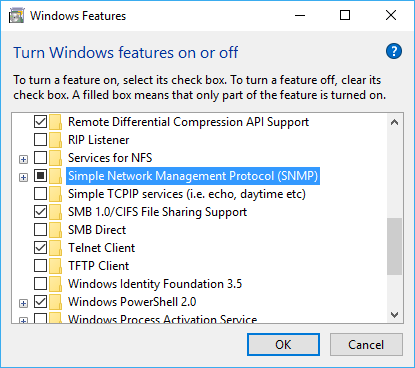
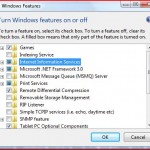
In Windows Vista, Windows 7, Windows Server 2008 and Windows Server 2008 R2, click Start button, then go to Control Panel. Click on Programs -> Programs and Features link and then click on Turn Windows features on or off. If you’re prompted with User Account Control dialog, click “Continue”.
In Windows 8, Windows 8.1, Windows 10, Windows Server 2012, Windows Server 2012 R2, Windows Server 2016 or later, open the Control Panel, then click or tap on Programs -> Programs and Features link, followed by Turn Windows features on or off. If you’re prompted with User Account Control dialog, click “Continue” or “Yes”.
- In Components of Windows XP or Windows Server 2003, click on the Management and Monitoring Tools (make sure that you do not select or clear, tick or untick its check box to change the existing selection), and then click Details.
- Select and tick the check box of Simple Network Management Protocol (SNMP), Simple Network Management Protocol or SNMP feature.
- Click OK. In Windows XP or Windows Server 2003, you need to click additional Next button.
SNMP service will be installed on the system. You may require to insert the Windows setup CD/DVD disc into optical drive.
- SNMP will start automatically after installation. But it’s recommended to verify the service status from Services in Control Panel or Task Manager, and if it’s stopped, you can start the SNMP service from there.
Two new services will be created:
- SNMP Service which is the main engine with agents that monitor the activity in the network devices and report the information to the monitoring console workstation.
- SNMP Trap Service which receives trap messages generated by local or remote SNMP agents and forwards the messages to SNMP management programs running on this computer.
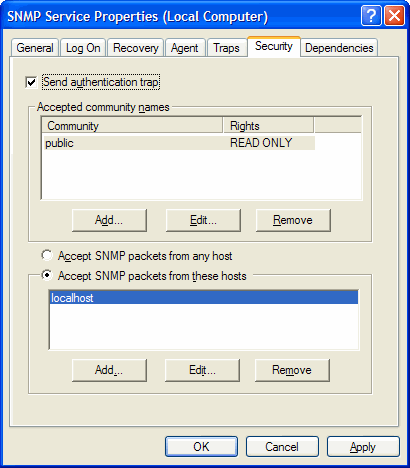
Windows doesn’t assign any community string to the SNMP service by default, and also only allow access from localhost (this computer only) or local devices. Further configuration is needed to add in desired community string, which act as the password to grant reply to any SNMP request from remote system.
How to Configure Security Community String for SNMP Service
Note: The following guide public community string as example.
- Open Control Panel.
- In Windows XP, go to Performance and Maintenance, while the other versions of Windows, System and Maintenance link.
- Open Administrative Tools.
- Run Services applet.
- Locate and right click on SNMP Service, then select Properties.
- In SNMP Service Properties window, click on Services tab.
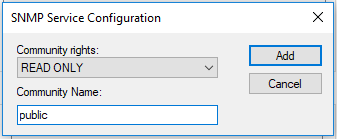
- Under “Accepted community names” section, click Add button.
- Select the appropriate permission level for the community string in the “Community Rights” drop down list to specify the authentication that the host used to process and grant SNMP requests from the selected community. Normally READ ONLY is recommended.
- In the “Community Name” box, type public or any case-sensitive community name that you want.
- Click on Add button.
- In order for the SNMP service to accept and receive SNMP request packets from any host on the network, including external remote host regardless of identity, click Accept SNMP packets from any host.
To limit the acceptance of SNMP packets, click Accept SNMP packets from these hosts, and then click Add, and then type the appropriate host name, IP or IPX address in the Host name, IP or IPX address box. You can restrict the access to local host or limited servers only by using this setting. Finish off by clicking Add button again.
- Click OK when done. Note that you may need to reboot for the settings to take effect.
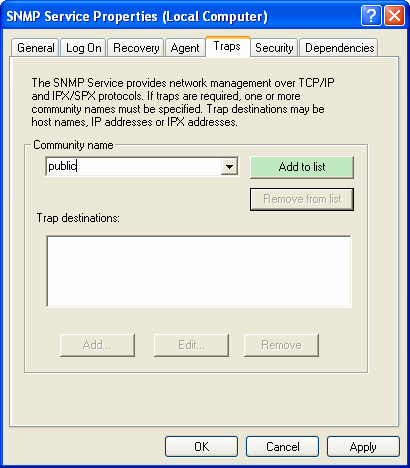
Optionally, if you requires to send SNMP traps to remote trap destination, you can configure it at the “Traps” tab.
How to Configure SNMP Traps
- Open Control Panel.
- In Windows XP, go to Performance and Maintenance, while the other versions of Windows, System and Maintenance link.
- Open Administrative Tools.
- Run Services applet.
- Locate and right click on SNMP Service, then select Properties.
- Go to Traps tab.
- In SNMP Service Properties window, click on Traps tab.
- In the “Community name” text box, enter public or any other case-sensitive SNMP community name to which this computer will send trap messages.
- Click on Add to list button.
- Then, click or tap on the Add button below “Trap destinations” to enter IP addresses, host names or IPX addresses of the remove server that will receive SNMP traps.
