How to Compress Folders and Files
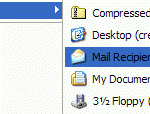
To compress all files and sub-folders inside a folder, right click on the folder in Windows Explorer. To compress a file, right click on the file in Windows Explorer. After that, choose Send To. And when sub-menu comes out, click and select Compressed (zipped) Folder. Windows will now compress all the contents inside the folder or the file and create a compressed folder, more commonly known as zipped file. Rename the compressed folder to your desired name, and if you want, delete the original file or folder.
To compress multiple files and/or multiple folders, just launch the Windows Explorer, and select all the files and folders (sub-folders will be included automatically) by holding the Ctrl key while clicking. If you want to select files and folders that listed continuously, just holding the Shift key, select the first item and the last item, and all items between them will be selected. Once selected, again, right click and click on Send To, and then Compressed (zipped) Folder. The name of the compressed folder will be based on the first file been compressed, so locate it and rename it to something meaningful. Delete the original files if you want.
How to Password Protect Compressed Folder
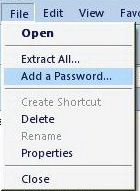
If you want to enhance the security and do not want others to view the contents of your compressed folder, you can assign password to the compressed folder or zip file. Locate your compressed folder or zip file in Windows Explorer or My Computer, then open the folder by double clicking on it. From the File menu, choose Add a password… (Encrypt in Windows Me), and key in your password twice then click on OK.
Note that all of the files in compressed folder are password-protected at the time of encryption or password adding. Any subsequent files will not be password-protected, to password protect subsequent files, the password needs to be removed and added again.
Note: Add a password to compressed folder (ZIP) is only available in Windows XP. Windows Vista and Windows 7 have removed such option, and user has to use third-party tool such as SecureZIP to password-protect compressed folders.
How to Remove and Disable Compressed Folder (zip file) Password
To remove the password of compressed folder or zipped file, just locate and open the compressed folder by double clicking it in Windows Explorer or My Computer, then from File menu, choose Remove password (Decrypt in Windows Me).
Tips and Tricks
1. Instead of compressing existing files or folders, it’s possible create an empty zipped and compressed folder to store future files in. Just go to the folder you want to store your compressed folder, click the New from File menu or from menu after right-clicking inside the folder. Then choose Compressed (zipped) Folder. Type in the name for the compressed folder.
2. To protect your sensitive files and folders on your PC from viewing by others, just send them to compressed folders and add a password to the compressed folder to keep it private.
3. You can drag and drop files or folders to a compressed folder. To do this, open the compressed folder first. Drag and drop does not move the files into the compressed folder, but copies them. If you want to move the files, hold down the Shift key when dropping the files into the compressed folder. Alternatively, you can manually delete the existing files.
4. Same with drag and drop, Send To function does not move the files either. To move, delete the existing files manually.
5. File names in password-protected compressed folder are visible even though the files themselves are inaccessible without the password. To hide them, create another compressed folder (not necessary to be password-protected) inside the compressed folder which will be password protected. With this, those unauthorized users can view the contents of protected zip file, which is another zip file, but not the contents inside the second zip file.


