Without using any third-party software applications, Windows has built-in ability to lock or hide a disk drive from easy viewing from Windows Explorer or File Explorer. Hiding a drive is useful to prevent easy access to the content and data especially if they are sensitive or confidential in nature.
The easiest way to hide a drive, whether it’s an entire disk, partition or volume, is by removing its drive letter. Without a drive letter, the drive won’t show up in Windows Explorer or File Explorer, and is not visible to people to have access to the PC.
Hide a Drive by Removing Drive Letter and Path with Disk Management
- Open Win X Quick Access menu and select Disk Management.
- Select the volume/partition that you want to hide.
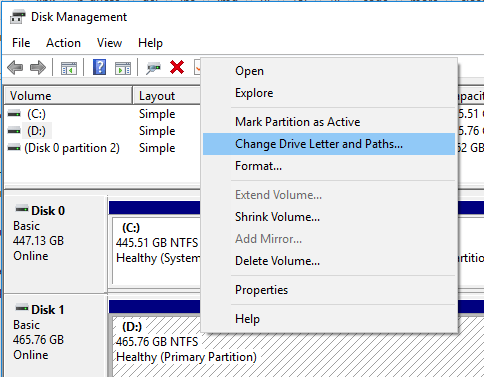
- Right-click the volume/partition and select Change Drive Letter and Paths from the contextual right click menu. Alternatively, select Change Drive Letter and Paths from Action -> All Tasks menu.
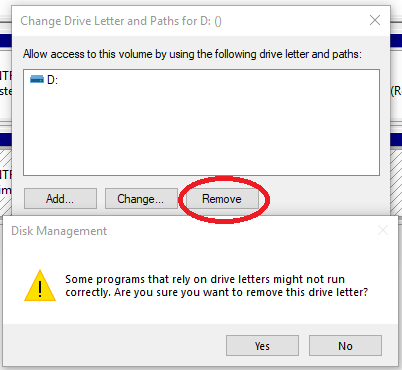
- Select the Remove button to disassociate the drive letter from the volume/partiton.
- Select Yes on the confirmation dialog to remove the drive letter. confirming you’d like to hide the disk or partition. If the drive is currently in use, it will still be available for use until computer restarts even though the drive letter is freed.
Hide a Drive by Removing Drive Letter with DiskPart Command
If you prefer to use Command Prompt to do the job, DiskPart can remove a drive letter too:
- Open an Administrator’s Command Prompt.
- Type DiskPart and hit Enter.
- Type List Volume and hit Enter to show a list of all volumes and partitions.
- Type Select Volume X where X is the numerical number of the volume represents the drive that you want to hide, e.g “Select Volume 1”, and hit Enter.
- Type Remove Letter=X where X is the drive letter for the drive that you want to hide and selected in previous step, and hit Enter.
When DiskPart successfully removed the drive letter or mount point, the drive is hidden from view.
Assign Letter=X
Hide Drive by Using Group Policy
- Run Local Group Policy Editor (gpedit.msc).
- Navigate to the following branch:
User Configuration -> Administrative Templates -> Windows Components -> File Explorer
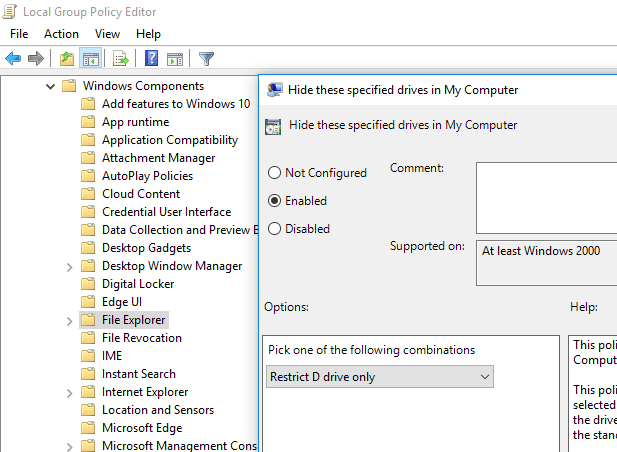
- Double-click on Hide these specified drives in My Computer and select Enabled.
- Then, select the drive that you want to hide form the drop-down menu.
When enabled, the icons of specified drives are removed from My Computer and File Explorer, and the drive letters representing the selected drives do not appear in the standard Open dialog box. This policy setting removes the drive icons. Users can still gain access to drive contents by using other methods, such as by typing the path to a directory on the drive in the Map Network Drive dialog box, in the Run dialog box, or in a command window.
- Click on OK and restart the computer for the change to take effect.
Hide Drive via Windows Registry
If you don’t have Local Group Policy Editor, you can modify and edit the Windows Registry directly to hide the drive.
- Run Registry Editor (regedit).
- Navigate to the following registry key:
HKEY_LOCAL_MACHINE\SOFTWARE\Microsoft\Windows\CurrentVersion\Explorer
- Right click on the “Explorer” tree or the blank area on the right pane, and create a New -> DWORD (32-bit) Value.
- Name the new value as NoDrives.
- Double click on “NoDrives” to modify its value data. Enter the value data according to the unique number associated with drive letter that you want to hide as listed in table below. The table lists the value in decimal, so when entering the value data, choose the base as Decimal.
Drive Letter Value (in Decimal) A 1 B 2 C 4 D 8 E 16 F 32 G 64 H 128 I 256 J 512 K 1024 L 2048 M 4096 N 8192 O 16384 P 32768 Q 65536 R 131072 S 262144 T 524288 U 1048576 V 2097152 W 4194304 X 8388608 Y 16777216 Z 33554432 All Drives 67108863 If you want to hide multiple drives, enter the sum of the values for the drives as the decimal value data. - Restart the computer.
Hide Drive via Windows Registry
For PowerShell lovers, it’s possible to use PowerShell commands to modify the registry and assign the value to “NoDrives” registry key.
Set-ItemProperty -path "HKCU:\Software\Microsoft\Windows\CurrentVersion\Policies\Explorer" -name NoDrives -value X -type DWORD
Replace the value X with decimal value representing the drive letter as listed in the table above for Registry Editor method. Restart the computer when done for the drive(s) to be hidden.
