Part 2 – Post-Installation Configuration Tasks of FreeBSD 6.0
Articles in the Series
- Installing FreeBSD 6.0 with Ports Collection Updating
- Post-Installation Configuration Tasks of FreeBSD 6.0 (This Article)
- Installing MySQL Server 5 with FreeBSD Ports Collection
- Installing Apache HTTPD Web Server 2.2
- Installing PHP Hypertext Preprocessor Scripting Language 5 and PHP 5 Extensions
- Select [Yes] and press Enter when prompted the following message to configure Ethernet or PPP/SLIP network devices:
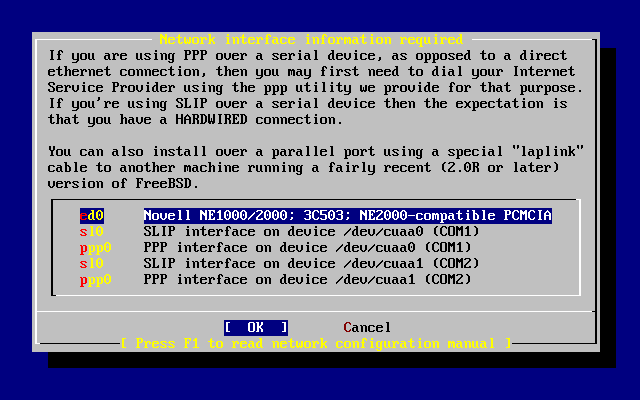
User Confirmation Requested Would you like to configure any Ethernet or SLIP/PPP network devices? [ Yes ] No - Select your Ethernet network card to configure.
- IPv4 network protocol is sufficient, as IPv6 is not yet common, so select [No] and press Enter when prompted whether to enable IPv6 interface.
User Confirmation Requested Do you want to try IPv6 configuration of the interface? Yes [ No ] - Try to automatically retrieve network configuration from DHCP server (normally the Internet router is a DHCP server to lease IP address). Select [Yes] and press Enter at the following message:
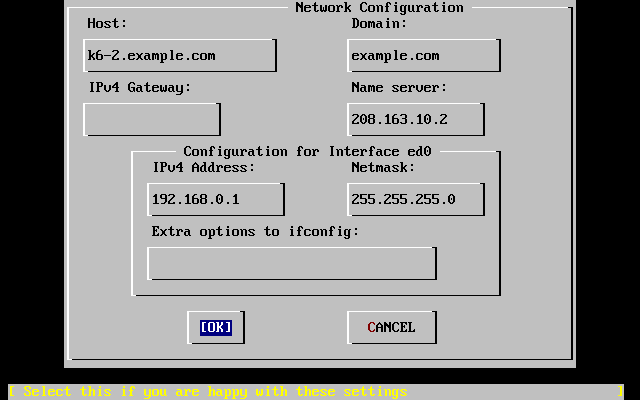
User Confirmation Requested Do you want to try DHCP configuration of the interface? Yes [ No ] - Network configuration screen will be shown next. Use Tab to move between various fields to enter the required information. If you have DHCP server, most of the fields, including IPv4 Address, Netmask, Name Server and IPv4 Gateway, should be filled up, you only need to enter the Host and Domain (if need to change). Host is the fully-qualified hostname, such as k6-2.example.com in the illustration below, and Domain is the name of the domain that the server is in, such as example.com.
When done, use Tab key to select [OK] and press Enter.
- Select [Yes] and press Enter if prompted to enable the network interface.
User Confirmation Requested Would you like to Bring Up the ed0 interface right now? [ Yes ] No - Select [No] when prompted whether want the server to function as network gateway.
User Confirmation Requested Do you want this machine to function as a network gateway? [ Yes ] No - Select [No] when prompted whether want to enable inetd and network services. No will disable ftp and telnet service, as SSH is a more secure method to access the server remotely.
User Confirmation Requested Do you want to configure inetd and the network services that it provides? Yes [ No ] - Select [Yes] and press Enter when prompted to enable SSH access to securely access the server remotely.
- Disable anonymous FTP access by select [No] when prompted.
User Confirmation Requested Do you want to have anonymous FTP access to this machine? Yes [ No ] - Select [No] as it’s not a NFS (Network File System) server.
User Confirmation Requested Do you want to configure this machine as an NFS server? Yes [ No ] - Select [No] for NFS client.
User Confirmation Requested Do you want to configure this machine as an NFS client? Yes [ No ] - There is no need to customize any system console settings such as font, keymap or screen saver, so select [No] when prompted.
User Confirmation Requested Would you like to customize your system console settings? [ Yes ] No - Set the time zone by selecting [Yes].
User Confirmation Requested Would you like to set this machine's time zone now? [ Yes ] No - Most computers are set to local time, and not UTC, so select No to continue.
User Confirmation Requested Is this machine's CMOS clock set to UTC? If it is set to local time or you don't know, please choose NO here! Yes [ No ] - Use arrow keys to scroll and select your region, or continent.
- Use arrow keys to scroll and select your country.
- If you’re in a country that span across several time zone, then select the time zone of your location when prompted.
- Select [Yes] and press Enter when asked if the name of time zone looks reasonable.
- Enable Linux binary compatibility by selecting Yes.
User Confirmation Requested Would you like to enable Linux binary compatibility? [ Yes ] No - Select [No] when asked if the system has mouse, as there is no X-Windows installed.
- Select [No] when asked to browse the FreeBSD packages collection to skip it.
User Confirmation Requested The FreeBSD package collection is a collection of hundreds of ready-to-run applications, from text editors to games to WEB servers and more. Would you like to browse the collection now? [ Yes ] No - Select [Yes] when prompted to add user to the system. It’s advisable to set up at least another user for regular use instead of using the powerful root to work on the system.
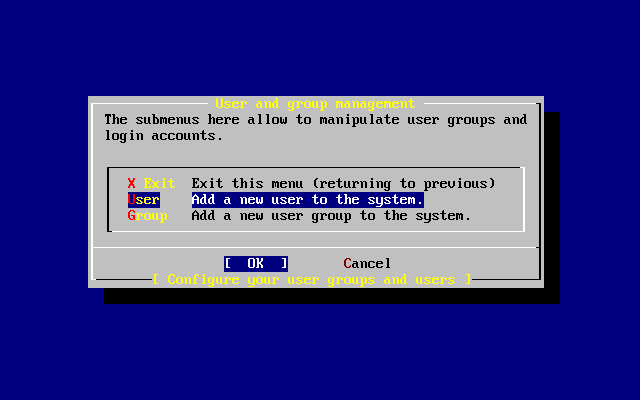
User Confirmation Requested Would you like to add any initial user accounts to the system? Adding at least one account for yourself at this stage is suggested since working as the "root" user is dangerous (it is easy to do things which adversely affect the entire system). [ Yes ] No - Select User to add user at the screen.
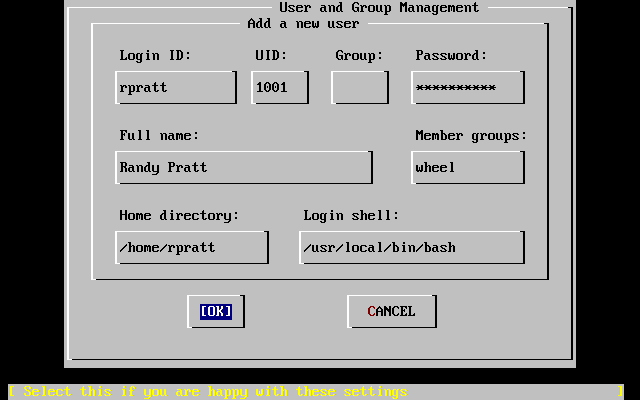
- User tab to move between field, and enter your desired User ID and password for the new user. For Group, enter ‘wheel’ (without quote – to allow the new user to perform administration tasks). Other settings can be left blank for default.
When done, select OK and press Enter.
- When back at the User and Group Management screen, select Exit and press Enter.
- Press Enter to set the password for root system manager.
Message Now you must set the system manager's password. This is the password you'll use to log in as "root". [ OK ] [ Press enter to continue ] - Key in the new password for root twice.
- Select [No] and press Enter when asked to review the configuration set to skip the review.
User Confirmation Requested Visit the general configuration menu for a chance to set any last options? Yes [ No ] - When back at sysinstall Main Menu, use arrow keys to select “Exit Install” and press Enter.
- Select Yes to reboot the FreeBSD system. While rebooting, remove the FreeBSD CD.
User Confirmation Requested Are you sure you wish to exit? The system will reboot (be sure to remove any floppies from the drives). [ Yes ] No - When the system boots up, it will ask for an entropy source to create the secure keys. Just randomly enter some characters and numbers and press Enter to continue.
The set up, installation and configuration of a FreeBSD system completed. The system can now been remotely administered by using Secure-SSH client such as Putty, by connecting to the IP address that is configured just now.
