Remote Desktop, also known as Remote Desktop Services (RDS) or Remote Desktop Protocol (RDP), is a Windows service that allowed you to remote access or remote control the system from another computer. Useful when you want to connect to your home PC from office, or an IT administrator wants to manage remote computer, Remote Desktop server software has been incorporated or built into modern client and server Windows operating system, including Windows Vista, Windows 7, Windows 8, Windows 8.1, Windows 10 and so on, although in non-server Windows OS, Remote Desktop Server service is not enabled by default.
To let a Windows system to accept incoming Remote Desktop connection (Remote Desktop Connection, or RDC, is the Remote Desktop client which is included in all Windows systems), we need to turn on or enable Remote Desktop.
There are three ways to turn on and enable Remote Desktop service in Windows:
Enable Remote Desktop via Windows’ Graphical User Interface (GUI)
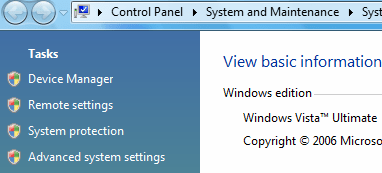
Click on Start button, then open Control Panel -> System and Security to select the System applet.
Alternatively, right click on Computer icon and select Properties on right click contextual menu.
Or, in Windows 8, Windows 8.1, Windows 10 or later, open WinX Quick Access menu, then select System to open “System Info”.
Click on the Remote settings link in the left task pane.
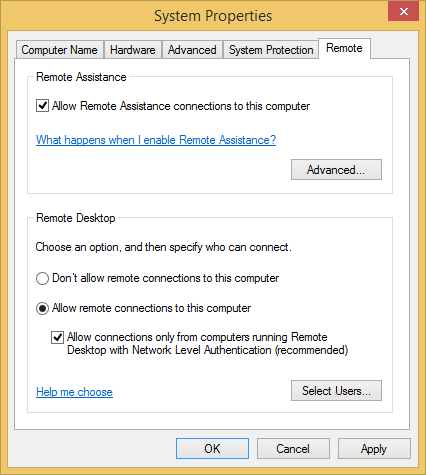
You will see “System Properties” window with Remote tab selected.
Select the radio button of either Allow connections from computer running any version of Remote Desktop (less secure) or Allow connections only from computer running Remote Desktop with Network Level Authentication (more secure) in Windows Vista; or Allow remote connections to this computer with optional Allow connections only from computer running Remote Desktop with Network Level Authentication (recommended).
If you’re using a Remote Desktop Connection client bundled in Windows Vista or later to initiate the Remote Desktop session, you can safely select the recommended more secure option. If you’re using older OS such as Windows XP or Windows 2000, do not select the “Network Level Authentication” option. See below note for more details.
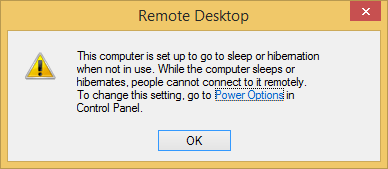
If prompted with dialog box reminding you that the computer is set to go to sleep or hibernation when not in use, the state that people cannot connect to it remotely, click OK.
Next, click on the Select Users button. You need to choose all non-administrative users that you intend to grant remote logon rights for them to remotely access or control this computer.
In the Select Users dialog, click on the Add button.
Type the name of the user you want to grant Remote Desktop access rights to allow he or she to connect to the computer via Remote Desktop, and then click OK.
Repeat above 2 steps to add more users.
Note
Adding users via Remote Desktop’s Select User dialog box actually adds the users to Remote Desktop Users group.
Click on OK twice to save the settings.
Turn on Remote Desktop on Windows via Group Policy
To enable the Remote Desktop functionality, navigate to the following location in local computer policy (via Local Group Policy Editor) or domain group policy (via Group Policy Object Editor for network wide effect to apply the settings across the entire Active Directory network):
Windows Vista Computer Configuration -> Administrative Templates -> Windows Components -> Terminal Services -> Terminal Server -> Connections
Windows 7, Windows 8, Windows 8.1, Windows 10 or Later Computer Configuration -> Administrative Templates -> Windows Components -> Remote Desktop Services -> Remote Desktop Session Host -> Connections
At the location, find the policy named Allow users to connect remotely using Terminal Services or Allow users to connect remotely using Remote Desktop Services, and set it to Enable.
To require the use of NLA and RDP version 6 or newer for more secure connection, browse to the following location in local computer policy or domain group policy (restrictions and functions same as above):
Windows Vista Computer Configuration -> Administrative Templates -> Windows Components -> Terminal Services -> Terminal Server -> Security
Windows 7, Windows 8, Windows 8.1, Windows 10 or Later Computer Configuration -> Administrative Templates -> Windows Components -> Remote Desktop Services -> Remote Desktop Session Host -> Security
In the folder, search for Require user authentication using RDP 6.0 for remote connections or Require user authentication for remote connections by using Network Level Authentication, and set it to Enable.
To control which users have access to the Windows system via Remote Desktop, you can add the authorized users to Remote Desktop Users group on the local machine, while those denied access should be removed from the list.
Enable Remote Desktop on Windows via the registry
Open Registry Editor (RegEdit).
Navigate or browse to the following key:
HKEY_LOCAL_MACHINE\SYSTEM\ControlSet001\Control\Terminal Server
Locate the fDenyTSConnections subkey, and change the DWORD value to 0.
To enforce the use of RDP 6.0 and NLA, navigate to the following key:
Locate the UserAuthentication subkey, and change the DWORD value to 1.
Exit registry editor and restart the computer to make the changes effective.
Once you have enabled or turned on Remote Desktop, Windows will automatically open the required and necessary ports in Windows Firewall to listen and accept any incoming Remote Desktop connections.
Note
Network Level Authentication (NLA) is a new protocol implemented since Windows Vista in Remote Desktop to provide more secure connections where NLA will authenticate the user prior to a full remote desktop connection being established. With this feature, Remote Desktop uses fewer resources on the remote machine during the initial handshake state, and helps to prevent RDP-related denial of service attacks. NLA is built into the Remote Desktop Connection (RDC) client which is version 6 of the terminal services client. For older PC, such as Windows XP and Windows Server 2003 SP1, Microsoft provides downloads to install the new RDC client.
LK is a technology writer for Tech Journey with background of system and network administrator. He has be documenting his experiences in digital and technology world for over 15 years.
Connect with LK through Tech Journey on Facebook, Twitter or Google+.


")
 via Registry in Windows 10/8/7/2016/2012/2008/XP")

")

")